


This blog is intended for users who are willing to create a highly available cluster for stateful applications, on bare metal. This is certainly a challenging case for teams who are trying to avoid cloud provider lock-in.
HashedIn had one such opportunity to set up a HA K8s cluster for stateful application and deploying the microservice-based application on it. It was for one of the telecom giants in India and thus high availability and scale was a very important consideration.
- No single point of failure – All components of setup must be replicated and HA.
- Failover for master – Setup must have multiple master nodes, all having access to the same worker nodes. Being a self-managed setup, the master will have to be managed separately as HA.
- Master promotion – If all master fails then setup must promote any slave to master.
- Load balancer – Ensuring that scale and failover seamlessly.
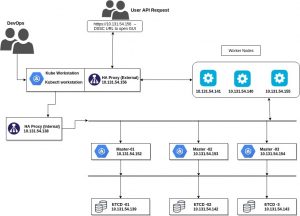
- 3 master servers with connectivity between each other and etcd servers on port 2379 and 2380, as well as the worker nodes.
- 3 worker servers with connectivity to all the master servers.
- 3 etcd servers with connectivity to each other as well as the master servers. See them as DB for the K8s control plane. All information is replicated in these.
- 2 HAProxy servers with connectivity to the master servers. One(internal) for load balancing between master nodes and worker nodes. Another for external load balancing.
- 1 workstation with connectivity to all servers(like a bastion host). All K8s commands will run here and physical access to the cluster is allowed only through this server.
* IPs are representational. You may use any CIDR.
- Setup Bastion host
- Setup K8s clusters
- Setup HAProxy servers
- Setup Helm and Tiller
- Disable swap-on all the K8s servers and check the connectivity between all the servers using the following
command: swapoff -a - Enable IP forwarding on all servers:
echo "net.ipv4.ip_forward=1" >> /etc/sysctl.conf - Install dependencies from ”requirements.txt”:
sudo pip install -r requirements.txt - Copy “inventory/sample” as “inventory/mycluster” :
cp -rfp inventory/sample inventory/mycluster - Update Ansible inventory file with inventory builder :
curl -s https://packages.cloud.google.com/apt/doc/apt-key.gpg | sudo apt-key add -

sudo touch /etc/apt/sources.list.d/kubernetes.list

echo "deb http://apt.kubernetes.io/ kubernetes-xenial main" | sudo tee -a

/etc/apt/sources.list.d/kubernetes.list

sudo apt-get update

sudo apt-get install -y kubectl
Review and change parameters under “inventory/mycluster/group_vars” :
cat inventory/mycluster/group_vars/all/all.yml

## We can add the load balancer details over here.

cat inventory/mycluster/group_vars/k8s-cluster/k8s-cluster.yml

## change the networking and other data as per your requirements.
Deploy the script as the root user:
ansible-playbook -i inventory/mycluster/hosts.yml --become --become-user=root cluster.yml
apt update

apt install haproxy
Change the necessary configuration, according to your needs. Test the connection by accessing the URL of haproxy IP with the opened port.
1. Install Ansible version >=2.7.2 on a workstation. A workstation should have SSH access to all K8s servers over port 22
2. Python3 should be installed on all servers including workstation
3. For further help on Ansible installation please refer – https://docs.ansible.com/ansible/latest/installation_guide/intro_installation.html#installing-ansible-on-ubuntu
4. Copy the /etc/kubernetes/admin.conf from one of the master servers to ~/.kube/config file present in the workstation server.
5. Install kubectl on the workstation server
curl -s https://packages.cloud.google.com/apt/doc/apt-key.gpg | sudo apt-key add -

sudo touch /etc/apt/sources.list.d/kubernetes.list

echo "deb http://apt.kubernetes.io/ kubernetes-xenial main" | sudo tee -a

/etc/apt/sources.list.d/kubernetes.list

sudo apt-get update

sudo apt-get install -y kubectl
Now you can run the kubectl commands from here for the desired requirements.
The following command downloads and runs the shell script for helm:
curl -L https://git.io/get_helm.sh | bash
Configure a service account for the tiller and install:
kubectl create serviceaccount \

--namespace kube-system \

tiller

kubectl create clusterrolebinding tiller-cluster-role \

--clusterrole=cluster-admin \

--serviceaccount=kube-system:tiller

helm init --service-account tiller

helm version
Create one storage class for dynamic provisioning of DB on NFS:
kind: StorageClass

apiVersion: storage.k8.io/v1

metadata:

name: managed-nfs-storage

provisioner: example.com/nfs

parameters:

archiveOnDelete: false
Apply above manifest file and run this command to verify:
kubectl get storageclass/sc
For dynamic provisioning, we can execute the below command, which will install the NFS provisioner with the help of helm chart:
helm install --set nfs.server=x.x.x.x --set nfs.path=/exported/path stable/nfs-client-provisioner
If you’re going for an on-premise setup of Kubernetes, this guide should help you give a high-level picture that often is missed when going for managed K8s services. Few important takeaways and things to explore in further details –
1. Provisioning dynamic storage with NFS.
2. Using a bastion host instead of a master node to control your K8s cluster by copying admin.conf file. You may also read about K8s RBAC to tighten up the security while using a bastion host.
3. No single point of failure is an essential part of any self-managed setup.