

24 Sep 2018
Step-by-step Docker tutorial for beginners


Tharika Tellicherry
#Technology | 1 Min Read


1) Introduction to Docker
Containers vs Virtual Machines
Terms “Containers” and “Virtual Machines” are often used interchangeably, however, this is often a misunderstanding. But, both are just different methods to provide Operating System Virtualization.
Standard virtual machines generally include a full Operating System, OS Packages and if required, few applications. This is made possible by a Hypervisor which provides hardware virtualization to the virtual machine. This allows for a single server to run many standalone operating systems as virtual guests.
Containers are similar to virtual machines except that Containers are not full operating systems. Containers generally only include the necessary OS Packages and Applications. They do not generally contain a full operating system or hardware virtualization, that’s why these are “lightweight”.
Virtual Machines are a way to take a physical server and provide a fully functional operating environment that shares those physical resources with other virtual machines.
Whereas, a Container is generally used to isolate a running process within a single host to ensure that the isolated processes cannot interact with other processes within that same system. Containers sandbox processes from each other. For now, you can think of a container as a lightweight equivalent of a virtual machine.
Docker enables creating and working with Containers as easy as possible.
Getting started with Docker
We explore the basics to get started with Docker. The parts include:
Part 1: How to Install Docker
Part 2: How to use Docker Images
Part 3: How to create Production Ready Docker Image
Part 4: How to deploy with docker compose
Part 5: Web App To Multi-Host App Using Docker Swarm
3) Part 1: How to Install Docker
To get started with docker basics, install docker using package manager like apt-get, yum, etc. Since our example system is running Ubuntu 16.4.1, we will do this using the apt package manager. To avoid confusion during docker basic training, I will avoid installation steps. After installation, for a start, to check if any containers are running we can execute the docker command using the ps option.
docker ps
CONTAINER ID IMAGE COMMAND CREATED STATUS PORTS NAMES
Deploying a pre-built nginx Docker
One of my favorite features of Docker is the ability to deploy a pre-built container in the same way you would deploy a package with yum or apt-get. To explain this better let’s deploy a pre-built container running the Nginx web server. We can do this by executing the docker command again. However, this time with the run option. The run function of the docker command tells Docker to find a specified Docker image and start a container running that image. By default, Docker containers run in the foreground.
In order to launch this Docker container in the background, I included the –d (detach) flag.
Step 1 – Trying to run a docker
docker run -d httpd -name test
Unable to find image 'httpd' locally
Pulling repository httpd
5c82212b43d1: Download complete
e2a4fb18da48: Download complete
58016a5acc80: Download complete
657abfa43d82: Download complete
dcb2sc3w3d16: Download complete
c79a417d7c6f: Download complete
abb90243122c: Download complete
d6137c9e2964: Download complete
85e566ddc7ef: Download complete
69f100eb42b5: Download complete
cd720b803060: Download complete
7cc81e9a118a: Download complete
docker ps
CONTAINER ID IMAGE        COMMAND       CREATED      STATUS PORTS           NAMES
f6d31sa07fc9 httpd:latest 4 seconds ago Up 3 seconds        443/tcp, 80/tcp test
Part 2: How To Use Docker Images
Images are one of Docker’s basic and key features and are similar to a virtual machine image. Like virtual machine images, a Docker image is a container that has been saved and packaged. Docker, however, doesn’t just stop with the ability to create images. Docker also includes the ability to distribute those images via Docker repositories which are a similar concept to package repositories. This is what gives Docker the ability to deploy an image like you would deploy a package with yum. To get a better understanding of how this works let us look back at the output of the docker run execution.
Break down of Step 2 – Image not found
docker run -d httpd
Unable to find image 'httpd' locally
Pulling repository httpd
5c82212b43d1: Download complete
e2a4fb18da48: Download complete
58016a5acc80: Download complete
657abfa43d82: Download complete
dcb2sc3w3d16: Download complete
c79a417d7c6f: Download complete
abb90243122c: Download complete
d6137c9e2964: Download complete
85e566ddc7ef: Download complete
69f100eb42b5: Download complete
cd720b803060: Download complete
7cc81e9a118a: Download complete
Stopping and Removing the Container
Let’s clean up our Docker environment to conclude docker basic training. We will do this by stopping the container from earlier and removing it.To start a container we executed docker with the run option, in order to stop this same container we simply need to execute the docker with the kill option specifying the container name.
docker kill test
test
docker ps
CONTAINER ID IMAGE COMMAND CREATED STATUS PORTS NAMES
docker ps -a
CONTAINER ID IMAGE COMMAND CREATED STATUS NAMES
f6d31sa07fc9 5c82215b03d1 4 weeks ago Exited (-1) About a minute ago test
docker rm test
test
Part 3: Production Ready Docker Image
Docker is a great tool to containerized an application(Containers, allow to package an application with its runtime dependencies). In HashedIn, we have been using docker for both internal & external projects and have learned good lessons from them. In this article, we will discuss strategy to create production-ready docker image taking intoCharchaaccount.
Important checklist for creating a docker image
Lightweight Image: Application should be packaged with a minimal set of things which is required to run the application. We should avoid putting unnecessary build/dev dependencies.
Never add secrets: Your application might need various secrets like credentials to talk to S3 / database etc. These are all runtime dependencies for the application and they should never be added to docker image.
Leverage docker caching: Every statement(except few ones) in Dockerfile, creates a layer(intermediate image) and to make build faster docker tries to cache these layer. We should pay attention to arrange our docker statements in a way to maximize the uses of docker cache.
Note: As per documentation
- Except for ADD & COPY, usually, instruction in dockerfile will be used to see matches for existing images.
- For the ADD and COPY instructions, the contents of the file(s) in the image are examined and a checksum is calculated for each file. During the cache lookup, the checksum is compared against the checksum in the existing images.
Dockerfile for Charcha
Let’s see dockerfile for charcha, which tries to adhere to the above-discussed checklist. Each instruction in dockerfile has been documented with inline comments which should describe the importance of the instruction.
1) Build docker image:
Create a docker image using above specified dockerfile.
$ docker build --rm -t charcha:1.0 .
.git
Dockerfile
docker-compose.yml
Procfile
2) Create a container from docker image:
   # This command will run shell in interactive mode for charcha container and will land you in
   # /charcha directory, because we have defined /charcha as our workdir in dockerfile.
   $ docker run -p8000:8000 -it charcha:1.0 /bin/sh
   # Running commands inside container
   /charcha $ python manage.py migrate
   /charcha $ python manage.py makemigrations charcha
   /charcha $ python manage.py runserver 0.0.0.0:8000
Part 4: Deployment with docker compose
Docker Compose is a tool for defining and running multi-docker apps. It allows you to create and test applications based on multifaceted software stacks and libraries. Here, we explore ways to use docker-compose to manage deployments.
Need for Docker Compose
An application can consist of multiple tiers or sub-components. In containerized deployment, these components need to be deployed as an individual unit. For example, if an application consists of database and caching server, then the database and caching server should be considered as individual components and should be deployed as a separate component. A very simple philosophy is, “Each container should run only one process”.
Running multiple containers using docker CLI is possible but really painful. Also, scaling any individual component might be a requirement but this adds more complexity in management of containers. Docker-Compose is a tool which addresses this problem very efficiently. It uses a simple YML file to describe complete application and dependency between them. It also provides the convenient way to monitor and scale individual components, which it termed as services. In the following section, we will see how to use docker compose to manage Charcha’s production ready deployment.
Using docker compose to manage Charcha’s production ready deployment
In the previous section create production-ready docker image, we have created a production ready docker images ofcharcha.We are going to use the same image in this discussion. Let’s start with simple compose file. For the production system we need the following things:
Database: As per our settings file, we need postgres.
App Server: A production ready app server to serve our Django app. We are going to use gunicornfor this.
Reverse Proxy WebServer: Our app server should be running behind a reverse proxy to prevent it from denial of service attack. Running gunicron behind a reverse proxy is recommended. This reverse proxy will also perform few additional things such as;3.1. Serve pre-gzipped static files from the application3.2 SSL offloading/termination. Read this to understand the benefits. Let’s build each service step by step in docker-compose.yml file created at the root of the project. For brevity, every step will only add configs related to that step.
1) Create service for database
“`YAML version: ‘2’ services: db: # Service name # This is important, always restart this service if it gets stopped restart: always # Use postgres official image image: postgres: latest # Expose postgres port to be used by Web service expose:
- 5432 environment: # Some environment variables accepted by postgres image
- POSTGRES_PASSWORD=password
- POSTGRES_USER=user
- POSTGRES_DB=charcha “` This is a simple docker-compose file to create a database as the service.
2) Create service for an app
To create our app service we are going to use previously discussed (Dockerfile)[/2017/05/02/create-production-ready-docker-image] for charcha. This service will run, db migration(and hence need to linked with database service) and run a gunicorn application at 8000.
Here is the app config which needs to be added in a previously created docker-compose file.
app:
    build: .
    # For this service run init.sh
    command: sh ./init.sh
    restart: always
    # expose port for other containers
    expose:
      - "8000"
    # Link database container
    links:
      - db:db
    # export environment variables for this container
    # NOTE: In production, value of these should be replaced with
    # ${variable} which will be provided at runtime.
    environment:
      - DJANGO_SETTINGS_MODULE=charcha.settings.production
      - DATABASE_URL=postgres://user:password@db:5432/charcha
      - DJANGO_SECRET_KEY=ljwwdojoqdjoqojwjqdoqwodq
      - LOGENTRIES_KEY=${LOGENTRIES_KEY}
    command: python manage.py migrate --no-input && gunicorn charcha.wsgi -b 0.0.0.0:8000
Create reverse proxy service:
To create reverse proxy service we are going to use official nginx image and will mount charcha/staticfiles folder into the nginx container. Before proceeding to create a docker-compose config for this service we need following things.
3.1 A SSL certificate:
Charcha production settings has been configured to only accept HTTPS requests. Now, instead of adding SSL certificate at App server, we will add certificate at nginx to offload SSL here. This will add performance gain. Follow these steps to create SSL certificate.
3.2 An nginx config file:
# On linking service, docker will automatically add
  # resolver for service name
  # Use upstream to resolve the service name.
   upstream backend {
       server web:8000;
   }
   server {
     # listen for HTTPS request
     listen 443 ssl;
     access_log  /var/log/nginx/access.log;
     server_name charcha.hashedin.com;
     ssl_certificate /etc/ssl/nginx.crt;
     ssl_certificate_key /etc/ssl/nginx.key;
     ssl_protocols TLSv1 TLSv1.1 TLSv1.2;
     ssl_prefer_server_ciphers on;
     ssl_ciphers "EECDH+AESGCM:EDH+AESGCM:AES256+EECDH:AES256+EDH";
     ssl_ecdh_curve secp384r1;
     ssl_session_cache shared:SSL:10m;
     ssl_session_tickets off;
     add_header Strict-Transport-Security "max-age=63072000; includeSubdomains";
     add_header X-Frame-Options DENY;
     add_header X-Content-Type-Options nosniff;
     ssl_dhparam /etc/ssl/dhparam.pem;
     # Serve all pre-gziped static files from its mounted volume
     location /static/ {
         gzip_static on;
         expires     max;
         add_header  Cache-Control public;
         autoindex on;
         alias /static/;
     }
     location / {
         # Set these headers to let application to know that
         # request was made over HTTPS. Gunicorn by default read
         # X-Forwarded-Proto header to read the scheme
         proxy_set_header Host $host;
         proxy_set_header X-Real-IP $remote_addr;
         proxy_set_header X-Forwarded-Proto $scheme;
         proxy_redirect off;
         # Forward the request to upstream(App service)
         proxy_pass http://backend;
     }
   }
   server {
    # Listen for HTTP request and redirect it to HTTPS
    listen 80;
    server_name charcha.hashedin.com;
    return 301 https://$host$request_uri;
   }
nginx:
    image: nginx:latest
    restart: always
    ports:
      - 80:80
      - 443:443
    links:
      - web:web
    volumes:
      # deployment is the folder where we have added few configurations in previous step
      - ./deployment/nginx:/etc/nginx/conf.d
      - ./deployment/ssl:/etc/ssl
      # attach staticfiles(folder created by collectstatic) to /static
      - ./charcha/staticfiles:/static
Name              Command              State          Ports
-------------------------------------------------------------------------------
charcha_db_1      docker-entrypoint.sh postgres   Up      5432/tcp
charcha_nginx_1   nginx -g daemon off;            Up      0.0.0.0:443->443/tcp, 0.0.0.0:80->80/tcp
charcha_web_1     sh ./init.sh                    Up      8000/tcp
Additional stuff to help in debugging
- To view the logs for all services use docker-compose logs
- In case you want to see the logs for a particular service use docker-compose logs
eg. docker-compose logs web - For Login into running container ` docker exec -it
`
version: '2'
# define multiple services
services:
  # Web service which runs gunicron application
  web:
    # Create build using Dockerfile present in current folder
    build: .
    # For this service run init.sh
    command: sh ./init.sh
    restart: always
    # expose port for other containers
    expose:
      - "8000"
    # Link database container
    links:
      - db:db
    # export environment variables for this container
    # NOTE: In production, value of these should be replaced with
    # ${variable} which will be provided at runtime.
    environment:
      - DJANGO_SETTINGS_MODULE=charcha.settings.production
      - DATABASE_URL=postgres://user:password@db:5432/charcha
      - DJANGO_SECRET_KEY=ljwwdojoqdjoqojwjqdoqwodq
      - LOGENTRIES_KEY=${LOGENTRIES_KEY}
  nginx:
    image: nginx:latest
    restart: always
    ports:
      - 80:80
      - 443:443
    links:
      - web:web
    volumes:
      # deployment is the folder where we have added few configurations
      - ./deployment/nginx:/etc/nginx/conf.d
      - ./deployment/ssl:/etc/ssl
      - ./charcha/staticfiles:/static
  db:
    restart: always
    image: postgres:latest
    expose:
      - 5432
    environment:
      - POSTGRES_PASSWORD=password
      - POSTGRES_USER=user
      - POSTGRES_DB=charcha
Summary
In deployment with docker compose series, till now we read how to create production-ready docker image and use it with docker-compose. You can try this in production with little changes(like reading environment variables instead of hard-coding in compose file) on a single large VM. In coming blogs we will further discuss gaps with docker-compose and be using ECS / Swarm /Kubernets like container management services, in a production environment to fill those gaps.
Part 5: Web App To Multi-Host App Using Docker Swarm
ften we run into architecting an application which has unpredictable load thus making it nearly impossible to predict the resource & infrastructure requirements during designing of a system. Additional design factors come into the picture if the application caters to the ever-changing hospitality industry, where we have to take care of dynamic content changes.
Various solution to these problems would have been discussed, but we tried to solve this problem by running multiple Docker containers on the same machine, thus utilizing the full power of hardware resources. Let’s dwell on the use case in detail for a better understanding of its design. The hospitality business web app under consideration had a legacy technology framework. They had on-prem, single server, on LAMP stack.
Over time, the systems were prone to security attacks & performance bottlenecks. There were many single points of failures in the system like Redis servers, Nginx and HAProxy; which was dangerous, given that we only had one on-prem server. Business wanted to scale and thus technology had to be upgraded. The need of the hour was to work in an agile mode and get things done on a short notice with high quality, reliability, and accuracy.
To cater to these technological challenges we needed to overhaul their existing framework, without impacting their business operations. With old systems, there was substantial maintenance cost associated and therefore, the business objective was cost reduction and reliability to support business scalability.
Few options that we considered
- Going along with AWS which provides most of the services out of the box
- Another option was to go with stand-alone servers and use Dockers
- Caching on HAProxy level or nginx level
- Using Redis Master-Slave or Sentinel architecture
The Final Verdict!
We decided to go with multiple Docker containers hosted on the same server. Reason being –
- Moving to AWS was shot down given the humongous existing on-prem setup
- We scaled up the number of servers and used Dockers Swarm, which would provide an automated management tool to manage all the containers
- Docker Swarm provides better fault tolerance & high availability to the application since a server crash will not impact the application. There is one catch with Docker Swarm, fault tolerance comes with odd numbers of servers only. That means, in the case of 3 servers, the application will work perfectly if one server goes off i.e, 1:3 ratio. We hope that Docker Swarm team adds support for the even number of servers also.
- Horizontal Scalability – Swarm add hosts to handle increased load without making changes to the application
- No Downtime during server maintenance/upgrades.
- The overall server was brought down by using Dockers
Solution Details:
In addition to using Dockers Swarm, multiple other components were re-thought.

Fig 1: High-level Multi-Host Architecture for our client
Fig2: The detailed layered internal architecture
- We moved away from traditional Redis setup to Redis Sentinel setup, thus avoiding another single point of failures in the system.
- We implemented 2 level of load balancing; one at HAProxy level by using replicas. The second one at Swarm Load Balancers. The load is distributed between servers.
- We also replicated micro apps within each container to ensure that resource utilization was most efficient at all times.
- We implemented centralized nginx with Etag for caching data. APIs data cached on nginx layer reduces the response time and increase performance. Etag is used to make sure duplication is avoided with the same data from API as Etag will change only when data is different from the one being cached in nginx.
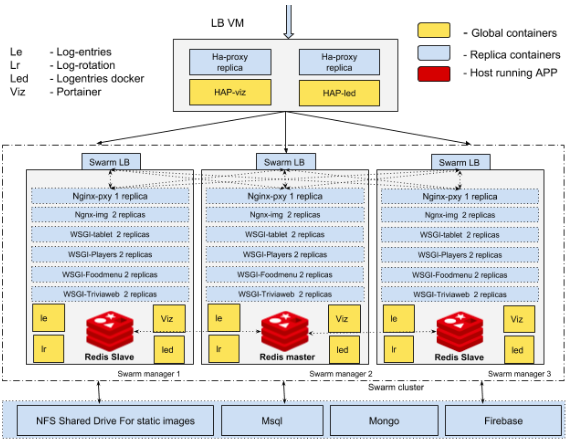
Fig 1: High-level Multi-Host Architecture for our client

Fig2: The detailed layered internal architecture
Tech Stack Choices:
Tech stack is our point of focus to assist architecture focus points. Our team engage and evaluate/design using React for UI implementation and rely on python for backend integration. Software portability and maintenance defines the tools utilized and for easier deployment. Currently, Redis is used for in-memory caching of data and sessions.
Redis is an in-memory database structure, which persists our data and hence reduces our external DB calls for fetching data. In design cases, where two-way communication is a priority along with compatibility and security,
Firebase is our choice. Firebase, which is a mobile or web application development platform provides data storage and real-time synchronization. Firebase supports both react and python and provides malleable rule sets with security features.
Software Deployment and Testing
Given the need of being first time right in the business use case, we follow test-driven approach. In this approach, the team starts with test cases and then proceed towards actual implementation. In order to reduce the tester dependency, the team has implemented an automated unit and integration test cases. These test cases reduce the tester’s effort by around 40%; thus improving the delivery speed and quality.
“Writing test cases is Worth the time”
In case of deployment, continuous deployment setup is engaged where jenkins will trigger a build automatically at a particular/specified time. With production, development comes the performance part of it. In order to make sure product performance is stable, our team has used multiple tools – Jmeter, AB and gatling. In all these tools, define the API to test, the number of users and gradually increase the users to recreate the actual scenario. Such robustness testing has yielded praises from our clients.
Having deployed solutions at client base and they are testimonials to our design efforts. Our applications run on more than 50,000 devices placed across the United States with more than 2 million requests with zero downtime and 4x performance improvement.
Conclusion:
To go ahead with multi-host implementation, we need to keep track of the following things:
Choose framework depending on the use case
Fault Tolerance comes with odd numbers servers only (Eg. FT will be 1 with the 3 servers, 2 with the 5 servers and so on) in Docker Swarm.
Read similar blogs
Blog

02 Nov 2022, 5 min read
From Cloud First to Cloud Serious
Despite the fact that cloud is over a decade old, many cloud strategies still focus on understanding and migrating to cloud, as opposed to fully exploiting cloud from a business and IT perspecti…
Blog

21 Oct 2021, 13 min read
Putting the power of a cloud-enabled workforce to work
To become a cloud-enabled organization and realize its full ROI, best-in-class leaders are looking beyond technology across the organization and business, technology, and HR lea…
Need Tech Advice? Contact Our Cloud Experts