Shubham Yadav
#Latest Blogs | 5 Min Read
Objective
Setting up a Kubernetes cluster over VMs can cause a large overhead and cause other applications on the system to slow down. Thus, creating a containerized K8s cluster will reduce this overhead and is well suited for testing purposes. This means that a K8s cluster will have Docker containers instead of VMs as worker nodes.
Overview
KIND came into the picture when one of our clients had the requirement of deploying k8s cluster on local machines. This was more of a requirement to onboard the product team on the functionalities of Kubernetes and what k8s brings which other orchestration tools like Docker Swarm, Mesos and Hashicorp’s Nomad doesn’t have. Setting up a full-fledged cluster would not be possible on a single machine without hampering the productivity of a developer’s work. Hence the light-weight KIND was used to provide almost all the functionality of k8s without causing any more overhead on the machine.
Background
KIND is a tool for running local Kubernetes clusters using Docker container “nodes”. KIND is primarily designed for testing Kubernetes 1.11+.
Why KIND?

  1. Supports multi-node (including HA) clusters
  2. Customizable base and node images
  3. Can use your local Kubernetes branch
  4. Written in go, can be used as a library
  5. Can be used on Windows, MacOS, and Linux
  6. CNCF certified conformant Kubernetes installer

Use-Cases:

  1. KIND in a ci pipeline
  2. Local development
  3. Demos of newer Kubernetes features
  4. Kinder tooling to test kubeadm
  5. “/test pull-Kubernetes-e2e-kind” on Kubernetes PRs for faster e2e feedback. It should be roughly 15-20 minutes currently.
Prerequisites
These are the versions that have been tested and proved to work:

  1. Go Version : go1.11.5 darwin/amd64
  2. Docker Version: docker-ce-18.09.2

Additional Requirements
Git Version: 2.17.2

Kubectl Version: 1.13.4 – 1.14.1

How to set up the k8s-cluster with KIND on MacOS?
Installing brew:

/usr/bin/ruby -e “$(curl -fsSL https://raw.githubusercontent.com/Homebrew/install/master/install)”

Installing wget:

brew install wget

Installing git :

brew install git

Installing kubectl:

To download version v1.14.0 on macOS, type:

curl -LO https://storage.googleapis.com/kubernetes-release/release/v1.13.4/bin/darwin/amd64/kubectl

Make the kubectl binary executable :

chmod +x ./kubectl

Move the binary into your PATH :

sudo mv ./kubectl /usr/local/bin/kubectl

kubectl version

Making a cluster directory:

mkdir cluster

cd cluster

wget https://dl.google.com/go/go1.11.5.darwin-amd64.tar.gz

tar -xzf go1.11.5.darwin-amd64.tar.gz
The above action will create a folder named go with the binary files in it. Now we will export the go path and put the same in ~/.bash_profile to be working even after we log-off from the user.

export PATH=$PATH:$HOME/cluster/go/bin

Now run go version and it will give the go version extracted.

Put the same entry in bash_profile. If the file doesn’t exist then create one as,

vim ~/.bash_profile

export PATH=$PATH:$HOME/cluster/go/bin

For making the changes to take effect immediately, run :

source ~/.bash_profile

Checking the go environment variables are set as they should be:

go env

will give the following output. Make sure that the $GOPATH and $GOROOT have different directories.

Or

You can set up the GOPATH and GOROOT environment variables manually as:

export GOPATH=$HOME/go

export GOROOT=$HOME/cluster/go

Installing docker-ce:v18.09.2 from the following link:

https://hub.docker.com/editions/community/docker-ce-desktop-mac

Or

wget https://download.docker.com/mac/stable/Docker.dmg

and install the same.
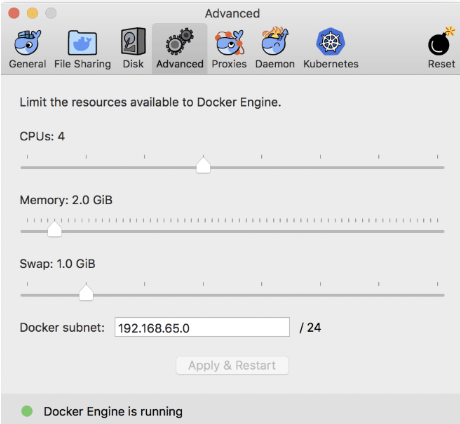
Set CPUs to 4

Memory to 2.0 GiB

Check the docker version from CLI to confirm that the docker is successfully installed.

Now we will get KIND for setting up k8s-cluster:

go get -u sigs.k8s.io/kind

It is almost 1.58 GB and will take a little time after that it will create a KIND folder in the GOPATH directory.

export PATH=$PATH:$HOME/go/bin

and add the same to ~/.bash_profile like previous additions.

kind version gives 0.3.0-alpha

Now for a KIND HA k8s-cluster we will need to create a configuration file:

Create a config.yml file in the directory cluster that we created initially. Get the following file from git repo:

wget https://github.com/shubhamsre/kind/blob/master/configha.yml

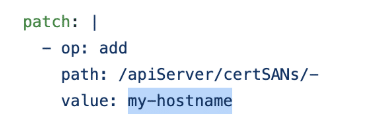
Run hostname to get the hostname of your system.

vim configha.yml

Change the hostname from my-hostname to your hostname

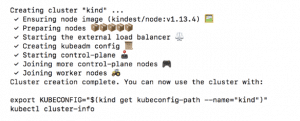
Now the power step is to run the setup for the cluster :

kind create cluster –name kindha –config configha.yml

The output is as follows:

Export the Kube-configuration as:

export KUBECONFIG=”$(kind get kubeconfig-path –name=”kindha”)”

kubectl cluster-info

The below results will be given somewhat resembling this:

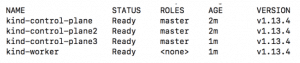
All the nodes must get to the ready state and they may take some time for the same :

Run kubectl get nodes -o wide to get node status for Kubernetes Cluster


Adding alias for kubectl can be done as :

alias k=’kubectl’

and adding the same to the ~/.bash_profile.

You can add a role to the worker node as :

kubectl get nodes

kubectl label node kind-worker node-role.kubernetes.io/node=

The ~/.bash_profile should have the following contents:

export PATH=$PATH:$HOME/go/bin

export PATH=$PATH$HOME/cluster/go/bin

export KUBECONFIG=”$(kind get kubeconfig-path –name=”kindha”)”

alias k=’kubectl’

alias K=’kubeadm’

Error Messages and Troubleshooting
While Creating the Cluster if you encounter the following message:

“failed to init node with kubeadm: exit status 1”

It shows that it is an error message stating that kubeadm cannot perform a certain task so you need to increase the CPU cores and memory for the system.

While Creating the Cluster if you come across the following message

” Error: could not list clusters: failed to list nodes: exit status 1″

It means that this error message states that the docker is not running and before creating the cluster please ensure the docker is in running state.

Judelyn Gomes
#IT | 4 Min Read
Docker is currently the most invaded and popular container platform in the technological world. They have been open source from their inception and this has led Docker to dominate the current technology market. Currently, 30% of enterprises use Dockers in their AWS ecosystem and the number continues to develop.

The essential elements necessary to run a Docker container should be built before it can be run. Docker is the most efficient tool that makes it easier to create, deploy, and run applications by using containers. It is designed to benefit both developers and system administrators, making it a part of many DevOps (developers + operations) toolchains. For developers, it grants them the freedom to focus on writing code without worrying about the system that it will ultimately be running on. It also allows them to get a head start by using one of the thousands of programs already designed to run in a Docker container as a part of their application. For the operations team, Docker gives flexibility and potentially reduces the number of systems needed because of its small footprint and lower overhead.

However, with a large number of teams adopting Dockers to follow trends, there are a few gaps we often come across in the usage of Dockers. These gaps often lead to critical cost, performance and security issues. Here are a few tips with which these gaps can be avoided or mitigated. Note that these are basic checkboxes for your Docker setup. One size doesn’t fit all is still applicable and you should tweak these based on your use case.

  • By definition, containers are ‘lightweight’, that means in most use cases image size doesn’t need to exceed 200 MB.
  • Smaller size images also mean faster builds. If your build and deployment time is more than 15 mins, then you need to fix it. This would help you save significant time and cost on your build Resources.
  • Effectively use docker layering, i.e. every subsequent image version must have the difference written at the bottom of the Dockerfile.
  • Your container should be self-contained i.e. no external dependencies.
  • Only one image propagates from the Dev environment to production. If you’re building an image again for production then you’re not leveraging the ‘Consistency’ benefits of docker.
  • Logs should be sent to stdout & stderr i.e. don’t log to a file, instead log to “console”. Docker automatically forwards all standard output from containers to the built-in logging driver.
  • Run as a user with the least privileges; don’t use sudo with any docker command. This may lead to major security loopholes.
  • Don’t use the ‘latest’ tag, it is not immutable. Have more control over your versioning system.
  • Even the non-technical team members should be able to run applications with simple docker pull and docker-compose up / docker run command.
  • Verify base docker images to avoid images from unknown sources to be pulled by enabling “Docker Content Trust” with the following command – export DOCKER_CONTENT_TRUST=1
  • Have a smaller build context by keeping a minimal number of files in the directory where you run the docker build command. You may also use .dockerignore to exclude files to be sent to Docker build context.
  • After using apt install command, ensure to clean /var/lib/apt/lists/* directory to remove the downloaded packages. This helps in reducing image size.

On the whole, Docker possesses the capability to get more applications running on the same hardware than other technologies, it makes it easier for developers to quickly create ready-to-run containerized applications. Docker also helps in managing and deploying applications much easier.

Madhura Arun
#Data Engineering | 7 Min Read
Apache Kafka is a highly scalable event streaming platform known for its performance and fault tolerance. It is used by reputed companies such as LinkedIn, Yahoo, Netflix, Twitter, Uber and many more. Kafka can be used with applications that need real-time stream processing, data synchronization, messaging and building ETL (Extract, Transform, Load) pipelines.


Originally, Kafka was designed as a message queue, but we know today that Kafka has several functions and elements as a distributed streaming platform. We can use Apache Kafka as:

  • Messaging System: a highly scalable, fault-tolerant and distributed Publish/Subscribe messaging system.
  • Storage System: a fault-tolerant, durable and replicated storage system.
  • Streaming Platform: on-the-fly and real-time processing of data as it arrives.
SCALING YOUR KAFKA CLUSTER

Kafka can either be run in a standalone mode or distributed mode. A Kafka cluster typically consists of a number of brokers that run Kafka. Within the broker there is a process that helps publish data (push messages) into Kafka topics, this process is titled as Producers. A consumer of topics pulls messages off a Kafka topic. In order to achieve high availability, Kafka has to be set up in the form of a multi-broker or multi-node cluster. As a distributed cluster, Kafka brokers ensure high availability to process new events. Kafka, being fault-tolerant, the replicas of the messages are maintained on each broker and are made available in case of failures. With the help of the replication factor, we can define the number of copies of the topic across the cluster.

Adding new brokers to an existing Kafka cluster is as simple as assigning a unique broker id, listeners and log directory in the server.properties file. However, these brokers will not be assigned any data partition of the existing topics in the cluster, unless the partitions are moved or new topics are created the brokers won’t be doing much work. Certain clusters are called as unbalanced clusters because of the following problems:

  • Leader Skew
  • Broker Skew
  • One of the easiest ways to detect them is with the help of a Kafka Manager. This interface makes it easier to identify topics and partition leaders that are unevenly distributed across the cluster. It supports the management of multiple clusters, preferred replica election, replica re-assignment, and topic creation. It is also great for getting a quick bird’s eye view of the cluster.

    An unbalanced cluster can generate unnecessary disk, CPU problems or even the need to add another broker to handle unexpected traffic. The following constraints have to be kept in mind while rebalancing your cluster:

  • Current distribution
  • Optimal selection of brokers
  • The optimal number of desired replicas
  • Partition weight
  • SOLVING LEADER SKEW
    Let us consider a scenario where a topic has 3 partitions, replication factor of 3 across 3 brokers.


    All the reads and writes on a partition goes to the leader. Followers send fetch requests to the leaders to get the latest messages from them. Followers only exist for redundancy and fail-over.


    Consider a scenario where a broker has failed. The failed broker might have been a host of multiple leader partitions. For each leader partition on a failed broker, its followers on the rest of the brokers are promoted as the leader. For the follower to be promoted as the leader it has to be in sync with the leader as fail-over to an out-of-sync replica is not allowed.


    If another broker goes down then all the leaders are present on the same broker with zero redundancy.


    When both the brokers 1 and 3 come online, it gives some redundancy to the partitions but the leaders remain concentrated on broker 2.

    This leads to a leader unbalance across the Kafka brokers. The cluster is in a leader skewed state when a node is a leader for more partitions than the number of partitions/number of brokers. In order to solve this, Kafka has the facility of reassigning leaders to the preferred replicas. This can be done in two ways:

    1. The broker configuration auto.leader.rebalance.enable=true allows the controller node to reassign leadership back to the preferred replica leaders and thereby restore the even distribution.
    2. Running Kafka-preferred-replica-election.sh forces the election of the preferred replica for all partitions: The tool takes a mandatory list of zookeeper hosts and an optional list of topic partitions provided as a JSON file. If the list is not provided, the tool queries zookeeper and gets all the topic partitions for the cluster. It might be a tedious task to run the Kafka-preferred-replica-election.sh tool. Customized scripts can render only the necessary topics and their partitions and automate the process across the cluster.
    SOLVING BROKER SKEW
    Let us consider a Kafka cluster with 9 brokers. Let us consider the topic “unbalanced_topic”. The topic has been assigned to the brokers in the following way:

    The topic “unbalanced_topic” is skewed on the brokers 3,4 and 5. Why?

    A broker is said to be skewed if its number of partitions is greater than the average of partitions per broker on the given topic.

    It can be solved by using the following steps:

    1. Using partition reassignment tool (Kafka-reassign-partition.sh), generate (with the –generate option) the candidate assignment configuration. This shows the current and proposed replica assignments.
    2. Copy the proposed assignment to a JSON file.
    3. Execute the partition reassignment tool to update the metadata for balancing.
    4. Once the partition reassignment is completed, run the “Kafka-preferred-replica-election.sh” tool to complete the balancing.

    The Kafka-reassign-partitions.sh has its limitations as it is not aware of partitions size, and neither can provide a plan to reduce the number of partitions to migrate from brokers to brokers. By trusting it blindly, you will cripple your Kafka cluster performance.

    A customized script can be written which would render the optimal assignment of the partitions. The script should follow the steps below:

    1. Obtain input from the user for the topic which has to be rebalanced.
    2. Capture the existing configuration of the Kafka Cluster and identify the brokers on which the particular topic is skewed. This information should consist of the number of partitions (NOP), partitions and Leader partitions for each broker.
    3. After obtaining the above information, we can calculate the optimal number of partitions per broker. (Optimal number of partitions (ONOP) = Total number of partitions across all brokers/ Total number of brokers)
    4. Form a path for reassignment of partitions in such a way that the partitions are moved from the Brokers whose NOP > ONOP to the Brokers whose NOP < ONOP. Make sure that the Leader partitions have minimal movement. This step has to be iterative.
    5. Output the information into a JSON file which is acceptable to be run with “Kafka-preferred-replica-election.sh”. The format to be followed can be obtained using the partition reassignment tool “Kafka-reassign-partition.sh” by generating a candidate assignment configuration.

    Note that the above script takes the Topic name as the user input and output the JSON file with respect to the particular Topic. Once the reassignment is successful for all partitions, we can run the preferred replica election tool to balance the topics and then run “describe topic” to check the balancing of topics. On the whole, rebalancing your Kafka is the process where a group of consumer instances (belonging to the same group) co-ordinate to own a mutually exclusive set of partitions of topics that the group is subscribed to. At the end of a successful rebalance operation for a consumer group, every partition for all subscribed topics will be owned by a single consumer instance within the group.

    Sugandh Pasricha
    #IT | 10 Min Read
    With Dockers doing the rounds in the technical world there is a more practical approach towards deploying applications and several companies are now becoming a part of this change and opting to move towards containerization. Well, HashedIn was graced with such an opportunity to handle the containerization for a client, around 150 java, go and python based applications were dockerized and the best practices were followed for a stupendous outcome.
    One of the KPI of our success was reducing build time. This blog covers a few tips on how we can reduce the build time of a docker image and focus on ensuring that the build time was minimal :
    • Small-Image size
    • Fast build-time
    If you’re new to Docker you can refer to our blogs, Getting started with Docker, Create Docker Image, Step-by-step Docker tutorial for beginners.
    APPROACH TOWARDS SMALL-SIZED IMAGE
    Optimize RUN instructions in Dockerfile
    Every line that you write and execute in a Dockerfile starting with “FROM”, “RUN”, “COPY” and “ADD” creates a layer which is basically the building block of a docker image. These layers influence a lot on the build-time and size of the image that will be built out of the Dockerfile.
    Docker layers can be very useful where a similar image with different versions is to be run since the image building process becomes faster. But our requirement is to reduce the image build time from the very beginning.

    Well, how can that be done?

    Let’s have a look at the below example:

    FROM ubuntu:14.04 RUN apt-get update -y RUN apt-get install -y curl RUN apt-get install -y postgresql RUN apt-get install -y postgresql-client RUN rm -rf /var/lib/apt/lists/* CMD bash Below are some points to be considered when an image is to be built using this Dockerfile: Every RUN command will create a new Docker layer The apt-get update command increases the image size The rm -rf /var/lib/apt/lists/* command doesn’t reduce the size of the image Considering these to be constant, five layers are being generated by specifying five application-dependencies. This method of including dependencies increases the build-time, further increasing the image size. Collectively adding the constant dependencies together, i.e the kind of dependencies that do not/rarely tend to change reduces the number of image layers and creates large cache which reduces build-time for future image builds as well. With the following technique, the number of layers can be reduced: FROM ubuntu:14.04 RUN apt-get update -y && \ apt-get install -y curl postgresql postgresql-client && \ rm -rf /var/lib/apt/lists/* CMD bash The five extra layers created by using five RUN commands in the previous Dockerfile has now been converted into one single layer. Thus, the takeaway with this example is that similar dependency-related packages can be clubbed together as a single layer by including them in a single command which will make build-time faster and image-size reduced.
    PROPER USAGE OF DOCKER CACHE
    As learned in the previous section, new Docker layers are created for every ADD, RUN and COPY command. When creating a new image, Docker first checks whether or not a layer with the same content and history already exists in your OS. If that already exists, Docker can reuse it without any occupying any extra space. But if there is no such thing, then Docker needs to create a new layer. Let’s consider this example: FROM ubuntu:16.04 COPY ./sample-app /home/gradle/sample-app RUN apt-get update && apt-get upgrade -y &&\ apt-get -y install openjdk-8-jdk openjfx wget unzip -y && \ wget https://services.gradle.org/distributions/gradle-2.4-bin.zip && \ unzip gradle-2.4-bin.zip RUN /gradle*/bin/gradle build ENTRYPOINT [ “sh”, “-c”, “java -jar sample-app.jar”] The above Dockerfile performs the following tasks: Pull an ubuntu image as a base image of the Docker container Copy application’s code into the container Install and update all the dependencies Build jar file from all the dependencies Finally, run the jar file of the application Now consider we build this Dockerfile, the Dockerfile will be processed line by line, each layer will get created and finally, the image will be created in some time. After building the image we realize that there’s some mistake in the code or a new feature that has to be added in the application with the same set of dependencies mentioned in the RUN command. Required code changes will be made and again the image will be built. COPY ./sample-app /home/gradle/sample-app will create a new layer every time there’s a change in the source code. Due to this, the next command where all the dependencies are being installed will start afresh because the history of cached layers has changed. To prevent this, it’s always better to cache the data that are very less likely to change, which belongs to dependencies. Thus, we should install all the dependencies first, and add the source code on top of it. Once the source code is added it is something like this, FROM ubuntu:16.04 RUN apt-get update && apt-get upgrade -y &&\ apt-get -y install openjdk-8-jdk openjfx wget unzip -y && \ wget https://services.gradle.org/distributions/gradle-2.4-bin.zip && \ unzip gradle-2.4-bin.zip \ apt-get autoclean && apt-get autoremove COPY ./sample-app /home/gradle/sample-app RUN /gradle*/bin/gradle build ENTRYPOINT [ “sh”, “-c”, “java -jar sample-app.jar”] By using the above strategy, you can shorten your image’s build time and reduce the number of layers that need to be uploaded on each deployment. CLEANING UP USING APT-GET PACKAGES An application image can be optimized at a dependency level. Debian based images like Ubuntu can use several apt-get packages that help remove extra files that are not required anymore by the application. These extra files or binaries can be considered as inter-dependency, to elaborate the dependencies required by the application have their own set of dependencies which are needed in order to be installed. Once the application’s packages are installed, inter-dependency is not required anymore. These extra files or binaries end up taking a lot of space thus increasing image size and the build-time. In order to remove these inter-dependent files, it is mandatory to install the following cleaning packages: apt-get clean It clears the local repository of retrieved package files that are left in /var/cache. The directories it cleans out are /var/cache/apt/archives/ and /var/cache/apt/archives/partial/. apt-get autoclean It clears the local repository of retrieved package files, but it only removes files that can no longer be downloaded and are virtually useless. It helps to keep your cache from growing too large. apt-get autoremove Removes packages that are automatically installed because some other package requires them but, with those other packages removed, they are no longer needed. The packages to be removed are often called “unused dependencies”.
    UTILIZING .dockerignore
    .dockerignore file is basically used to list out the files that are not required in the application container. This file is supposed to be in the same directory where the build-context is present for the docker image build. Using this file, one can specify ignore-rules and exceptions from these rules for files and folder, that won’t be included in the build context and thus won’t be packed into an archive and uploaded to the Docker server. The following are the list of files that need to be included in .dockerignore file: Build logs Test scripts Temporary files caching/intermediate artifacts Local secrets Local development files such as docker-compose.yml Sample .dockerignore file: # ignore all markdown files (md) beside all README*.md other than README-secret.md *.md !README*.md README-secret.md Thus, .dockerignore files increase image optimization by decreasing image size, build-time and preventing unintended secret exposure.
    USAGE OF SMALL BASE IMAGE
    The base images which are big in size, for example, Ubuntu, have a lot of extra libraries and dependencies that are actually not required by the application for which the base image is actually used. These extra non-required dependencies of the base image only make the final application image bulkier. You can consider the following alternatives for small base image: Alpine : Alpine Linux is a Linux distribution built around musl libc and BusyBox. The image is only 5 MB in size and has access to a package repository that is much more complete than other BusyBox based images. It uses its own package manager called apk, the OpenRC init system, script driven set-ups. Scratch The scratch image is the most minimal image in Docker. For all other images, this is used as the source image. The image on the scratch is actually empty since there are no directories, libraries or any dependencies present in it. At a certain point in time, some dependencies will be missing when the image size is reduced, and you’ll probably have to spend some time figuring out how to manually install them. However, this is only a one-time issue, once resolved can lead to faster deployment of your applications.
    USING MULTI-STAGE
    The multi-stage build is a feature implemented in Docker 17.05 or higher versions. Multistage builds are useful for anyone having difficulties optimizing Dockerfiles when it comes to reducing the image-size or keeping them readable and easy to maintain. Following are the features of Multi-Stage: With multi-stage builds, one can use multiple FROM statements in your Dockerfile. Each FROM instruction tends to use a different base image, and each of them begins a new stage of the build. You can selectively copy artifacts from one stage to another, leaving behind everything you don’t want in the final image. Consider the following example, wherein the first stage is being utilized for copying the source code and building it using gradle in order to install all the dependencies of the application and package them into a jar file. In the second stage using a base image to provide a jar file with a run-time environment and copy the artifact (that’s our jar file) in the final stage and then finally running the application. #Stage 1 FROM gradle:4.8.1 AS build COPY –chown=gradle:gradle . /home/gradle/sample-app WORKDIR /home/gradle/sample-app RUN gradle build -x test #Stage 2 (Final Stage) FROM openjdk:8-jre-alpine WORKDIR /opt COPY –from=build /home/gradle/sample-app/server/build/libs/sample-app.jar . ENTRYPOINT [ “sh”, “-c”, “java -jar sample-app.jar”] Now, if you read through the Dockerfile you’ll notice that the alpine version is being used only in the final stage and not in all stages. But Why? That’s because the size of the docker image builds from this Dockerfile will be the one with either the final stage by default if not mentioned, otherwise using –target flag in the docker build command. The end result is the same tiny production image as before, with a significant reduction in complexity. This reduces the need to create any intermediate images and you don’t need to extract any artifacts to your local system at all.
    CONCLUSION
    There are a lot more best practices that must be followed in order to get an optimized docker image like using the correct versions of a base image rather than using the latest or being able to understand when to use COPY and ADD, etc. Following the above practices will surely make Docker implementation easier especially at the production level.
    Judelyn Gomes
    #Data Engineering | 6 Min Read
    Contemporary organizations are slowly but steadily understanding the potential value of data to their enterprise. As a result of this, companies are trying to build a brand-new generation of human behavioral norms and data infrastructure that complement their traditional legacy infrastructure, as well as data culture.

    While several businesses today focus on finding ways to effectively derive value from data with the help of which they desire to acquire certain business outcomes, doing so would be no cakewalk. Mining data for the purpose of carving analytics applications with the aim of driving competent decision-making and innovation takes a lot of expertise and resources. To make this process smoother and more efficient, businesses are choosing to replace the traditional data management with a gradually emerging set of practices known as DataOps.

    What is DataOps?
    DataOps involves a distinct approach towards agile data management that comprises the combination of three critical elements – people, processes, and tech. It is a junction of analytics delivery practices, as well as advanced data governance that include the data life cycle. Much like DevOps that focuses on speeding up software development, DataOps accepts continuous and agile delivery development systems and is typically supported by distinguished on-demand IT resources.

    DataOps has the potential to have incredible transformative effects on data processes. Its key aim lies in enabling companies to implement a process that effectively manages and uses their ever-increasing data stores in a competent fashion, ultimately reducing the overall time of data analytics.

    The market scenario of DataOps
    The collaborative data management practice of DataOps was first introduced in an official manner in the Gartner 2018 Hype Cycle sometime around mid-2018. It is a process for managing people, technology and data in a fashion that improves efficiency, as well as the ways in which data is used across a firm. It can be considered to be the application of DevOps practices to data integration and management combined with AL/ML to minimize the cycle time of data analytics while putting a good level of focus on monitoring, collaboration, and automation.

    While DataOps has not yet become mainstream when it comes to building data solutions, it essentially has raised a great amount of interest among people following the market evolution actively. In 2019 Gartner estimated the adoption rate of DataOps as less than 1% of the addressable market. Even though this is a relatively new domain, various proven technologies and competent practices involved in it are gradually becoming quite popular. These practices are known to possess expansive applicability for operational agility, data governance, as well as data analytics. DataOps is considered to be especially suitable for driving ML, AI, and deep learning methods, as these data-hungry technologies majorly require progressive improvements for the purpose of remaining effective.

    From DevOps to DataOps
    To truly understand DataOps and its increasing relevance to the data environment of today it is crucial to acquire a good insight on the practice it originates from, which is DevOps. DevOps has over the years emerged as one of the key methodologies related to software development and has changed the way of thinking in regard to the delivery of new fixes and features in applications frequently, while also making sure of high quality.

    DevOps has transformed the way how applications are built in the industry by applying agile practices to the process of product development and testing, and in a similar fashion, DataOps is concentrated on revolutionizing how data is integrated, shared and made available to the people.

    Importance of DataOps in the contemporary data environment
    With the rapid and exponential increase in the amount of data being gathered every passing day, an increasing number of companies are expected to turn to DataOps as a means to both capture and manage their evolving data in a highly flexible and efficient manner. This technology would ultimately improve how data loads are automated, integrated and shared, subsequently enabling companies to move data at the speed needed to remain competitive.

    In addition to aiding company managers to improve the accuracy and speed of their business insights with the help of automation analytics-ready data pipelines, the practice of DataOps would also eventually transform how data is consumed across a firm as a whole. This solution would ideally break down the silos in IT operations, ultimately paving the way to build superior speed and accuracy of data analytics. By efficiently leveraging real-time integration technologies, like CDC or change data capture as an element of its overall set of principles, DataOps is known to be expected to disrupt and eventually transform the data processes prevalent across the industry.

    The new cultural practices, solutions, and processes that are at the core of DataOps tend to allow firms to eliminate the manual processes that are associated with data delivery, making the system more agile and secure. These processes majorly include data versioning, provisioning and aligning database code with the relevant application code. DataOps subsequently helps in the fast provisioning of data production with masked data, while also synchronizing the database schema.

    In the coming years, it is expected that more and more companies would educate themselves on the practice of DataOps, as it would gradually start its transition journey from an abstract idea to a tangible practice. In the future, one might expect to see this practice further revolutionize the usage of information in the data era.

    DevOps XaaS: An emerging data solution
    With increasing awareness about the advantages of DataOps, a number of companies have come up in the market that offers DataOps as a service to discerning organizations. While many contemporary firms do have inbuilt facilities to efficiently support data operations, a number of them opt to outsource it as well. Well-established software development firms like HashedIn typically provide DataOps-as-a-Service or DevOps XaaS as a combination of managed services and cloud-based big data management platform. Many such firms provide purpose-built and scalable big data platforms that adequately adhere to the best practices when it comes to data security, privacy, and governance by opting to make use of DataOps components.
    Ashish Swarnkar
    #Latest Blogs | 5 Min Read
    Background 
    Amazon released AWS WAF (Amazon Web Services Web Application Firewall) at AWS re Invent in 2015, Later, the introduction of managed rules in 2017 made it more popular. 

    Background 
    WAF (Web Application Firewall) protects your AWS Powered Web Applications from the common web exploits such as SQL Injection, cross-site scripting, file inclusion vulnerability, and security misconfigurations (attempt to gain unauthorized access or knowledge of the system and access default accounts, unused pages, unprotected files, and directories, etc.)

    WAF provides us access control lists (ACLs), rules, and conditions that define acceptable or unacceptable requests or IP addresses. You can selectively allow or deny access to specific parts of your web application and you can also guard against various SQL injection attacks & XSS.

    You can use WAF by attaching it to API Gateway, Cloudfront, Application Load Balancer (ALB)

    Web ACL
    A web access control list (web ACL) gives you impenetrable control over the web requests that your Amazon API Gateway, Amazon CloudFront distribution, or Application Load Balancer responds to.

    You can use the following criteria to allow or block requests:

    • Source/Origin IP address
    • Source/Origin Country
    • String match or regular expression matching in a request
    • Size of the request
    • Detection of malicious SQL code or scripting
    Rules
    In every web ACL, rules are used to inspect web requests and decide the action when a web request matches the inspection criteria. Each rule requires one high-priority statement, which might have multiple statements, depending on the rule and statement type.

    Based on the criteria ACL can be used to block or allow web requests like the following:

    • XSS, which enables attackers to inject client-side scripts into web pages viewed by other users.
    • Origin IP Address or Range.
    • Origin Country or geo-location.
    • Length of particular parts of the request, for ex: query string
    • SQL injection. Attackers embed malicious SQL code to extract data from the database.
    • Part of any request, like, values that appear in the User-Agent, x-forwarded-for headers or text in query strings. You can use regex for identifying these strings.

    Rules Configured
    Manual IP lists (A and B): This component has two specific AWS WAF rules, you have to manually add IP addresses to these rules:

    • Blacklist: IP addresses that you want to block.
    • Whitelist: IP addresses that you want to allow.

    SQL Injection (C) and XSS (D): The solution has two native AWS WAF rules that are designed to protect against malicious SQL injection or cross-site scripting (XSS) patterns in the query-string, URI or body of a request.

    HTTP flood (E): This rule protects against attacks that exploit seemingly legitimate GET or POST requests to a server from a particular IP address, such as a web-layer DDoS (Distributed Denial of Service) attack.

    Scanners and Probes (F): This component parses application access logs scans for unwanted behavior, such as the unwanted amounts of errors generated from a source. It identifies the suspicious source IP addresses & blocks them.

    IP Reputation Lists (G): This component checks & blocks new ranges of IP addresses, with the help of IP Lists Parser AWS Lambda function for regularly checking third-party IP reputation lists and block them.

    Bad Bots (H): This component relies on a honeypot URL, It is a security mechanism intended to lure and deflect an attempted attack.

    Monitoring
    CloudWatch: By Default Cloudwatch is integrated with WAF, the Cloudwatch Graph shows the request count for each rule in this web ACL and the default action.

    But Cloudwatch Alarms doesn’t give the detailed monitoring & alerts on the 10-sec granularity for the blocked requests. As the alarm switch from Insufficient to Ok & vice versa, and state switching takes around 2-3 mins, which can miss the request being blocked during that interval.

    Logging
    By Default WAF doesn’t have logs enabled, We have to set up Kinesis Data Firehose for detailed logging, which is fully managed service for delivering real-time streaming data to the S3 bucket

    Kinesis Data Firehose stores all logs in the S3 bucket, logs help us identifying why certain rules triggered & why certain rules blocked with our specific ALC rules.

    Kinesis Delivery Stream is set on a buffer size of 5 MB and a buffer of 60 sec.

    AWS CloudTrail Logs: CloudTrail provides a log of actions taken by a user, role, or an AWS service in AWS WAF. Using the information collected by CloudTrail, you can determine the requestor to AWS WAF, the origin IP address, time of the request, and additional details.

    Best Scenario To Use WAF
    WAF is still in a transition stage. As per Gartner’s 2019 report, the adoption of WAF is still catching up and is increasing at a promising rate of 20% year on year. We see the future of WAF is automation and monitoring rather than being a layer in front of the web tier. With the emergence of DevSecOps, WAF will play a crucial role in early-stage testing and security scanning.

    Further, automation of WAF can be done with managed & custom Web ACL’s, Rules with CloudFormation Template. It can be integrated with any automation toolchain that you may already be using. WAF can be implemented in your QA environment where the team can perform intensive penetration testing. Each team’s test cases can be run against the WAF Enabled Environment.

    Thus, WAF is not just a reactive measure to implement security, it can also serve as a proactive measure to implement security through DevSecOps, which can be used in conjunction with CI/CD. With solid monitoring and logging integration, WAF can be a security center for your applications.

    Reet Shrivastava
    #IT | 4 Min Read
    AWS Lambda is Amazon’s very own reliable event-driven and serverless compute service.

    AWS Lambda is quite good at what it is meant for, i.e. building serverless micro-applications. Having said that, we should be cognizant of the fact that this is what Lambda is supposed to do. To adhere to the Lambda philosophy, AWS poses certain limitations on how lambda is supposed to be used.

    While working with AWS Lambda, we should be aware of these constraints and limits. For example, while working with huge machine learning and artificial intelligence libraries like Tensorflow, one constraint is the deployment package limit in Lambda.
    We should also be aware that if such situations arise, there are ways of overcoming these limitations. Below mentioned are some of the widely known limitations that exist in AWS

    Upload From S3
    Frameworks such as serverless and Zappa create a compressed zip to upload, but If we are not using any such external libraries, we will end up with a compressed zip file which we would have to upload to lambda. Now we need to bear in mind that the limit for a compressed zip/jar is 50 MB.

    In such cases, an option would be to let lambda pull the package directly from S3. For this, we need to create an S3 bucket and upload the zip to the bucket. We need to specify the S3 bucket and the zip file’s object key to update the lambda code and this will work perfectly fine for zips/jars up to 250 MB.

    The deployment limits the size of code/dependencies that you can zip into a deployment package in lambda is 250 MB, which means that the deployment of any package that exceeds this limit will still be rejected.

    Slim/Zip/noDeploy options
    These options are provided by the ‘serverless-python-requirements’ plugin which, as the name suggests, can be used when deploying Python lambdas.
    In the serverless.yml file, we can add these options to get everything down to size.
    – Slim – Removes unneeded files such as *.pyc, *.so, dist-info from the package.
    – Zip – Zip compresses the libraries into a .zip file and uploads that instead of the actual libraries. It also adds an unzip_requirements.py in the bundle. We would need to add the following four lines in the code:
    try:

    import unzip_requirements

    except for ImportError:

    pass

    These lines will unzip the requirements on lambda.
    – noDeploy – The libraries added under the noDeploy option in the serverless.yml file will be omitted from the deployment.

    The tmp directory
    The /tmp directory on lambda can be used to store up to 512MB of data. A workaround incorporating this is to zip the libraries and include them in the deployment package while unzipping them into the /tmp directory which has a directory storage limit of 512 MB, slightly larger than the usual 250 MB limit.

    Breaking the function into smaller lambda functions
    The ideal solution is the one that adheres to the Lambda philosophy of short-lived micro functions. If it is possible to break the large function with all the libraries into multiple smaller functions which make sense when being viewed in isolation, we should do it. We can either have a common handler that can trigger these functions in succession, or we can utilize the methods using which we can trigger an external lambda function from a running lambda.

    As is with everything, lambda has its strengths and limitations. The limitations are a part of what lambda stands for and its inherent nature. If serverless is what we endure, we need to learn to embrace lambda’s limitations. For exceptional situations, there are always workarounds as mentioned.

    Noorul Ameen
    #Data Engineering | 3 Min Read
    If you had ever tried to control your brain, your thoughts and emotions, you would have realised that our brain can think in two ways: Fast and Slow. At the same time, some of our thoughts and emotions might be controlled while others are not.

    FAST THINKING (a.k.a System 1 Thinking Mode)
    It is essential to think rapidly, be more intuitive and emotional. It is our first impression that might be wrong or with mistakes. There is no logic in this way of thinking, only feelings and comparisons have a place to be. Most of these decisions are taken in a completely unconscious and automatic manner.

    SLOW THINKING (a.k.a System 2 Thinking Mode)
    The brain reacts slowly, gets more focused and logical. This way of thinking is used to make big decisions, analyse or solve something. On a daily basis, we use mostly the 1st System that is quick and takes less effort. Normally, the 2nd System isn’t engaged unless there is a real need.
    The tmp directory
    The /tmp directory on lambda can be used to store up to 512MB of data. A workaround incorporating this is to zip the libraries and include them in the deployment package while unzipping them into the /tmp directory which has a directory storage limit of 512 MB, slightly larger than the usual 250 MB limit.
    According to the universal law of the Path of Least Resistance, the brain likes it when everything is clear and easy, without thinking too hard. What happens when our brain is forced to use the 2nd System for simple tasks and work for a while?

    • The main objective of UX Design is to take advantage of the 1st System of thinking. Make visitors think fast, using their emotions and feelings.
    • When the design is clear and flat, the colors are comfortable for the eye and that it expresses the feelings and emotions in the right way, our fast thinking is contented and accepts it.
    • Remember that when the user needs to focus and concentrate on details and functional parts, the brain will be using the 2nd System.
    • Try to make a research on how a group of people completes several tasks on a website or mobile app. After that, think and analyse at what moments their concentration and engagement increased.
    Summing up, remember that a good UX design is based on understanding how people perceive and process the information while they are scrolling on your website or using a mobile app. Stay tuned as I will present some samples how designers intentionally force users into System 2 Thinking mode while creating enterprise grade user experiences.

    Harshit Singhal
    #Latest Blogs | 4 Min Read
    As I day-dream about why Tesla hasn’t yet built an electric helicopter which would help with my daily commute to work; I can’t help but wonder, how many other people have this same thought!

    Like any other major urban city around the world, Bengaluru’s transit system has reached its tipping point. The rapidly increasing urban population has brought with it increased pressure on the city’s existing infrastructure. Despite technological advancements that have increased efficiency in most parts of our lives, the time spent in traffic has only increased.

    So, What is the Future of Urban Mobility?
    With a limited number of non-renewable resources, one future scenario for the mobility sector would be one of the shared economies. There will be a higher integration of vehicles and roads, leading to higher utilization of assets. In the coming decades, business-as-usual in the transit sector will just not cut it. Governments and industries need to work together to come up with innovative policies and pricing strategies. Moreover, apart from improvements in efficiency and convenience, sustainability also has to be at the core of new developmental strategies, to have harmonious mobility in urban cities. To overcome the heavy congestion faced by the urban city dwellers, mobility will move towards a multi-modal transport system, which would integrate different transportation services, such as walking, cars, buses, bikes, trains, and shared rides.

    Can Urban Mobility be Revolutionized?
    Micro-mobility was conceptualized with this intent. It refers to vehicles that can carry one or two passengers. Commuters could use these vehicles for short distances to get to their nearest preferred mode of public transport, therefore, solving the first-mile last-mile (FMLM) problem. From there, share their journey with other commuters who have the same destination. Over the last few years, many micro-mobility start-ups have emerged largely in China (Ofo and Mobike), US (Lime and Bird), and India (Rapido and Yulu). They have two business models: self-serve scooters or scooter rentals and bike taxis.
    Will Technology Shape Urban Mobility?
    Can technology eliminate our transportation woes, all-together?

    Urban planners and policy-makers have a tough task at hand. How can the decrease in the number of vehicles on the road be incentivized to implement safe and out-of-the-box solutions? Many organizations are now encouraging their employees to work-from-home and have meetings virtually, where possible.

    Apart from expanding their existing public transport systems, cities are also looking to digitize them. For example, in Helsinki, under the Mobility as a Service (MaaS) Action Plan, residents will be able to book and pay with one click for any trip by bus, train, taxi, bicycle, and/or car sharing, through one seamless app. This mobility-on-demand model aims to make personal cars redundant by 2025.

    Mobility hinges on the supply and demand of vehicles. In many urban cities, demand has been optimized through tools like congestion pricing, dedicated lanes for shared vehicles, off-peak deliveries, etc. On the other hand, optimizing supply would mean increasing or upgrading the existing infrastructure, but in densely populated and developed cities, this could be a major challenge.

    Changing Attitudes
    Although many cities around the world are investing in their existing public transit networks to improve mobility; the real challenge remains to change people’s perception of mobility. Apart from the convenience of commuting, owning a vehicle (or multiple) is seen as a status symbol in many parts of the world. However, with the rapidly expanding urban population comes with the challenges of pollution control and traffic congestion. Experiencing the daily struggle of both these factors should make people more inclined towards making conscious choices that would benefit both the community, as well as, the environment in the long run. On the bright side, in the US, vehicle ownership rates are decreasing. On the other hand, many cities have adopted permanent pedestrian and cycling zones in the heart of the city, in the hope to eliminate vehicular traffic all-together. In Milan, commuters are given free public transit vouchers to ensure they do not take their car to work. To ensure that no one cheats, an internet-connected box on the dashboard keeps track of the car’s location.
    Towards Transit-Oriented Development
    The future of urban mobility leaves us with more questions than answers. However, the onus of the future of urban mobility can not be placed on only the residents of a particular city, or the private or public sectors, alone. All have to work together to move towards a more integrated and seamless mobility future for urban cities. Urban planners and policymakers in emerging cities still have some leeway to make a city transit-oriented. In older cities, high-density, mixed-use development in urban areas with easy access to mass transit is the goal.
    Himanshu Varshney
    #General | 5 Min Read

    Well, every individual goes frenzy when it comes to your first job, and I am no exception. As a young developer, I myself wasn’t sure of the right career path when I graduated. Back then in 2003, most of the IT services were focused on backend operations and had limited scope for product development. There were only a handful of product companies in the market.

    As a young engineer, I craved to experiment, learn, code, and build new products. Like many new graduates, I too was weighing in the pros and cons of joining a service company versus a product company. I wasn’t sure of the technology that I loved the most. But I was determined to keep my passion for building new products and learning new technologies alive.

    Luckily for me, I got the best of both worlds when I joined Trilogy, a product development service company. Back then, the concept of SaaS product development services was still new. As people realized the business benefits of SaaS product development services, the demand and market for SaaS began to increase. Over the years, I got to work on a variety of technologies and lead projects for Fortune 500 companies across the world.

    Now, after nearly a decade of experience in product consulting, I can confidently say that joining the product development services company as a newbie was the best career decision I made in my life.

    While there are many perks of joining a pure product company, in my personal experience a service company is a good choice in the initial stages of your career (a stage where you are uncertain of what you want in your life).

    My stint at several SaaS product development services gave me the necessary exposure, and experience I needed. This paved a way to nurture my real interest and start my own company, HashedIn Technologies in 2010.

    Here are the top 5 reasons to join a Product Development Services Company in the initial stages of your career:

    1) Technical Breadth

    When it comes to technology, a services company is like a love cum arranged marriage, while a product company is like an arranged cum love marriage. In a product company, you are restricted to a few choices and technologies to work with. On the contrary, a product development service company gives you the chance to date and explore various technologies before you finally settle with the one that you are really passionate about. You are given the opportunity to play with multiple tech stacks and get wide exposure, before choosing your area of expertise. This also gives you the flavor of trying everything. This in a way helps you to get the right kind of exposure to diverse technologies in the initial stages of your career.

    2) Right Mentors

    The best part about working at a product development service company is the kind of mentors you get to work with. A good mentor can accelerate career progression and help you grow as a person. While there is a lot of focus on growth in product companies, there is limited opportunity for mentorship. In a race to move fast without breaking things, all efforts and resources are focused on scaling fast. You are mostly on your own. As a newbie, this can be scary. At a product development service company, you have the opportunity to work with experienced mentors who have been there, done that, and can guide you towards the right solution.

    3) Work With Industry Leaders

    In a product development service company, you are graced with the chance to work with a variety of customers and leaders like AWS, Redis, and Heroku. After your stint in an IT service company, you will have familiarity with multiple domains which would eventually help you to upskill yourself to a greater extent.

    4) Culture of Learning

    The work culture in product development service companies are very people friendly and focuses a lot on aspects like hiring, training, and events. As a fresher, I got to learn a lot from other teams with a wide exposure to varied scenarios of learning.

    5) Wear Multiple Hats

    If you want to get a taste of something more than just development, a product service company is the best option. As a newbie, I got to interact with clients, and manage projects besides just coding. In the early days of your career, this opportunity to explore multiple roles and don many hats helps you build an astounding portfolio for yourself.

    To conclude, your professional success depends on how well you know what you want in life. Some people figure this out early on. Some people take their time to find their true calling. There is no one right way to succeed. As a newbie, if you haven’t yet figured out life, it is okay. Join a product service company to kickstart your career, get the exposure you need to figure out what you really need and venture into a horizon that would lead you up the ladder of success.