Multi-tenancy is a type of architecture where one instance of a software application tends to serve multiple customers or tenants. In such a system, a software-as-a-service (SaaS) vendor can ideally run a single instance of its application on one instance of a database, and subsequently, offer web access to multiple customers. The data of each of the tenants remain isolated and invisible to other tenants in such a system.
Both businesses and developers aim for the most efficient and cost-effective approach when it comes to SaaS application development, and the multi-tenant system provides them with a more effective way to do so in comparison to the single tenancy system.
Multi-tenant SaaS system involves a centralized administration that maintains a common code-based application, as well as runs the common instances of the application for a discerning set of tenants. In addition to the software application, a multi-tenant database is also shared by each customer. As for the data, each dataset is tagged as they belong to an individual customer. The software is pre-programmed for segregating and securing the data for each user.
With a limited number of non-renewable resources, one future scenario for the mobility sector would be one of the shared economies. There will be a higher integration of vehicles and roads, leading to higher utilization of assets. In the coming decades, business-as-usual in the transit sector will just not cut it. Governments and industries need to work together to come up with innovative policies and pricing strategies. Moreover, apart from improvements in efficiency and convenience, sustainability also has to be at the core of new developmental strategies, to have harmonious mobility in urban cities. To overcome the heavy congestion faced by the urban city dwellers, mobility will move towards a multi-modal transport system, which would integrate different transportation services, such as walking, cars, buses, bikes, trains, and shared rides.
Can Urban Mobility be Revolutionized?
Here are some of the biggest reasons why businesses should opt for this system:
Expect a reduction in the investment in the long run: As a multi-tenant platform facilitates sharing of databases, resources and even the application itself, the overall investment of the tenants comes down considerably in the long run. The investment costs in this system are especially more reasonable when compared to single-tenant SaaS, as the total expenses are shared among multiple tenants. The vendor can essentially deliver SaaS solutions more cost-effectively in the multi-tenancy model as they do not have to bear any extra costs for each incremental tenant. The multi-tenant model enables the vendors to optimally utilize the benefits of economies of scale.
Optimized efficiency in performance: As the distinguished elements in the technology stack are typically shared, the SaaS architecture can provide optimal reliability, efficiency, and speed to the users. The vendors offer shared code, databases, as well as discerning elements of the technology stack to multiple tenants at the same time. This makes it easier for the vendors to assess and optimize speed, speed up response time across the entire system, and subsequently also update the technology stack whenever required. As a result, the high-efficiency level becomes a key identifier of the multi-tenant SaaS platform. In comparison to a single-tenant application, there is much superior scope for optimum utilization of resources in the multi-tenant system. As multiple tenants are using the same resources and infrastructure, maintenance gains momentum and utilization becomes optimum. Also, in most cases, if a tenant does not utilize a resource at any given point in time, the same can easily be used by another tenant.
Expedient upgrades, updates, and maintenance: The modules present in a multi-tenant application are usually highly configurable, enabling each tenant to use the application most conveniently without changing the relevant underlying code. Even the data structure in this system does not need to undergo any kind of change as the code is shared among multiple parties and remains common. It is quite easy to make upgrades to the technology stack or the application itself as it is needed to be done at only one centralized point, whose results are reflected at the ends of all the tenants. The maintenance costs, specific to Upgrades are shared among the pool of users with just one single system upgrade required, while maintenance of multiple applications or technology stacks is also not needed. In addition to this, the users also do not have to bother to update new features and updates in the system as such facilities would be provided by the SaaS vendor itself. Updates usually come as a part of the subscription of multi-tenant SaaS services.
Convenient onboarding of new tenants: Most vendors provide assurance of smooth and hassle-free onboarding to their clients. Typically, the processes involved in signing up and configuration of the domain/ sub-domain in a multi-tenant application are automated. The application also performs tasks like configuring of application and setup of default data for clients automatically.
In addition to the factors mentioned above, the multi-tenant architecture enables vendors to offer more prompt and efficient support services, resulting in smoother problem solving and troubleshooting techniques. While it has its pros and cons, the benefits of this system far outweigh its negative aspects and it should be the preferred choice for businesses to build their SaaS applications.
Judelyn Gomes
#Latest Blogs | 5 Min Read
Share:
In recent years, organizations have started to take advantage of the IT modernization and shifting of cloud-based solutions. Business agility is one of the key factors to sustain amid a competitive market and meet the demands of the customers. Smart organizational owners prefer to get hold of the cloud and its related technologies especially for reaping the long-awaited benefits.
The development and operations of software products are done as a result to keep pace with the evolving technical world. Due to the huge demand for software products, developing organizations have been using the DevOps experts to enable fast delivery.
Nowadays, DevOps experts are supporting organizations who are eager to achieve cloud migration. At this juncture, developing experts may face several challenges and get into certain traps while performing large-scale cloud migration. Continue reading to know the common mistakes and traps to avoid during cloud migration.
Cloud and Cloud Service Provider
The first and foremost mistake that every organization tends to commit, is by opting for a low-cost cloud and an ordinary cloud service provider. Organizations tend to perceive a pseudo thought, that all clouds are the same and the companies provide the same services for all clients.
Such organizations must understand that every cloud platform is unique and have different features. So, it is mandatory to look for the cloud service providers who offer suitable clouds to meet your organization’s demand and showcase features of flexibility and scalability. This would help DevOps experts to smoothly migrate the cloud.
Overloading of Data into Cloud
Once the cloud services are started some experts may plan to move everything to the cloud. Making use of the cloud for all processes may not be an avid solution. The DevOps experts should understand that all clouds would not support the applications ideally. It is therefore essential for DevOps professionals to evaluate the interoperability of the applications that are crucial for the business and the applications that are to be migrated to the new cloud environment.
Compatibility Issues in Operating System
The operating system is one of the major factors to be considered while performing a large-scale cloud migration. It is important for cloud migrating professionals to analyze the type of operating system that is currently running and its version.
Most of the IaaS (Infrastructure as a Service) providers enable several organizations to create Virtual Machines (VM) which can help them to make use of the recent operating system. It is of great necessity that an organization should ponder on the latest version operating system while doing a large-scale cloud migration. It is essential to check whether the required applications are running on the new operating system.
Availability of Software
It is mandatory to check if the third-party software can be reinstalled in the cloud during a large-scale migration. In case, it goes otherwise, the organization should have the software installation backup along with an exclusive option to download the same from the software developer. If DevOps experts fail to check the availability of certain software, it is the sole responsibility of the organization to pay for the software upgrades in order to have a hassle-free migration.
Database Server Issues
The server-based database is a major consideration while performing a large-scale cloud migration. The DevOps experts should maintain the condition of the application and update the version accordingly. Even changing the version of the server database application needs to be performed in a clear-cut manner, in order to avoid further complications.
Licensing Issues
In certain circumstances, the current license may not work with the cloud-based virtual machines. This is because, the software service providers tend to make use of the licensing mechanism, which may generate the license, based on various aspects of physical hardware.
A change in hardware signatures of the cloud service providers may be seen when new VMs are implemented. And so, it is important to keep track of licensing related issues and avoid relevant risks that can arise. On the other hand, if it is necessary to reinstall a large-scale application, the organization should acquire a new license or activation code from the service provider.
Security Issues
DevOps experts should never fail to ensure the security and safety of cloud migration. The less secured cloud services can lead to serious issues in the work environment and affect the growth of the organization. Therefore, every process should be carried out in a secured manner and it is necessary to ensure that the cloud applications are safe from data breaches, malware, and any other technical intrusions.
To conclude, these are some of the common traps to be avoided by DevOps experts during a large-scale cloud migration. The DevOps experts are advised to take a good time to audit the infrastructure and decide the cloud requirements of the existing application. Care should also be taken to keep a track of the cloud migration in order to avoid any hazardous outcomes.
Judelyn Gomes
#Latest Blogs | 4 Min Read
Share:
DevOps (Development and Operations) is a crucial software development technique commonly used to represent an agile relationship between development and IT operations. The main goal of DevOps is to enhance the relationship between those two aspects while achieving better collaboration and communication.
Generally, DevOps is used in the IT infrastructure to automate a wide range of processes from app development to several infrastructure operations. Nowadays, IT professionals are changing the way of project management and its techniques in their organization.
The constant changing DevOps methodologies are modifying the software development as well as the testing landscape in a better way. Do you want to understand the journey of DevOps for developing your organization? Take a look into this article and get to know about the DevOps and its related information.
What about DevOps and Its Benefits?
DevOps can be defined as a set of practices employed to automate the processes involved in software development and enable organizations to deliver the project in a fast and reliable manner. The concept of DevOps is completely based on building a culture of collaboration between the teams who used to work as silos.
Benefits of DevOps
Enhance Collaboration And Trust
Can Focus On Business Value
Reduce The Cost Of Downtime
Enable Organizations To Release Projects Faster
Integrate Various Skills Of Collaborative Team
Handle Competitive Risks Of Business Ideally
The value of DevOps can never be judgmental. It is important for every organization to take the right measures and implement DevOps in their environment to reap the complete benefits of it in real-time. The business owners who have started their journey of DevOps can drive it to the next level with greater ease.
Journey of DevOps
The journey of DevOps consists of a huge number of steps and stages to reach a specific organizational goal. Every organization should understand that DevOps is a vital decision and it cannot be implemented at once with much ease. From this article, you can know the journey of DevOps and different phases that you want to meet and its best practices.
What Are The 4 Stages Of Agile?
The modern software development project includes several processes than writing codes. Since, there are many processes, organizations need to move from one phase to the next while using different tools. Below are the four stages of Agile technology.
Waterfall Technique
Usually, the waterfall techniques are adopted in the enterprises as a manual process. During the software development process, the code is written, tested and delivered as per the sequence. The most important aspect is the collaboration of various teams based on silos method.
Agile Methodology
Organizations who have implemented agile techniques are considered under the categorization of fast waterfall stages. Such organizations make use of tools like GitHub to automate and increase the scalability. In addition to this, they also include a certain amount of automated testing to improve efficiency.
Continuous Integration
The risks involved in different stages of the DevOps journey can be reduced with the support of continuous integration platforms that are available. It is found that these tools are capable of automating the process involved in software development.
Continuous Delivery
Continuous delivery is considered as the final stage of the DevOps journey. Keep in mind that a fully automated development process in an organization can achieve continuous delivery. Here, the development and QA teams work together to bring the desired result.
Enhancing Testing Agility
The DevOps journey of an organization depends on certain factors such as tools for development, delivery, and production. These three helps identify the agility constraints used in the automated testing. After which an organization can increase the testing efficiency and grow agile than before. DevOps based tools and techniques help your organization to improve the testing efficiency. Some of the testing processes involved in DevOps journey are
Parallel Testing
Shift-Left Testing
Cloud-Based Testing
Automated Testing
Enhancing Company Culture with DevOps
DevOps can be implemented in an organization to encourage collaboration and arouse the spirit of teamwork between the employees.
This is because; the teamwork and collaboration have a huge impact on the success of a business. When DevOps is implemented in an organization, every employee is required to plan, write codes, based on the required operation, built, tested and employed in the integration environment effectively.
Final Thoughts
The journey of DevOps in an organization can be made perfect in varied ways and in the long run they help enhance the organization with the necessary technical strength. The establishment of DevOps helps fastens the software delivery and paves way for business innovation. Hence, it is essential to inculcate the aspects of DevOps in order to achieve the desired organizational goals.
Noorul Ameen
#Business | 2 Min Read
Share:
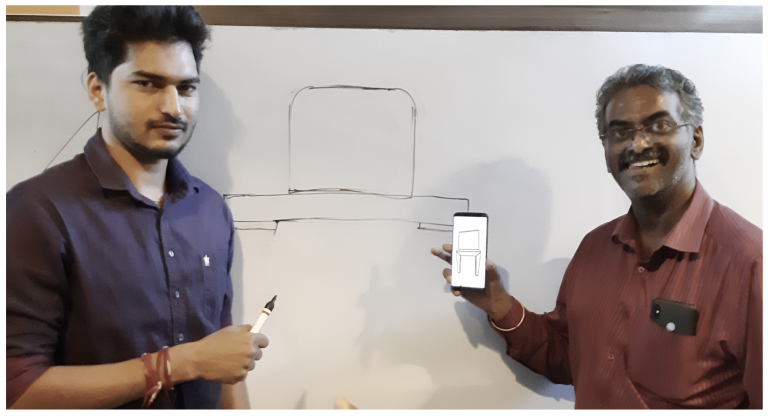
Communication is a process by which information is exchanged between individuals/groups through a common system of symbols, signs or behavior. In a business organization maintaining effective communication is of great value and importance, as it leads to create the desired effect or the required action. However in today’s business landscape where we work across geographies, time zones and cultures, maintaining a space for effective communication is always a challenge.
Communication Gap is when the meaning intended by the speaker or sender is not what is understood by the recipient. There might be several reasons for communication gaps to arise in the workplace. It is as much important to bridge the communication gap between employees, as it is to maintain effective communication in the workplace. Thus, identifying as to how the communication gaps emerge in the workplace and taking the necessary steps to maintain effective communication at work will be of great benefit to a business organization.
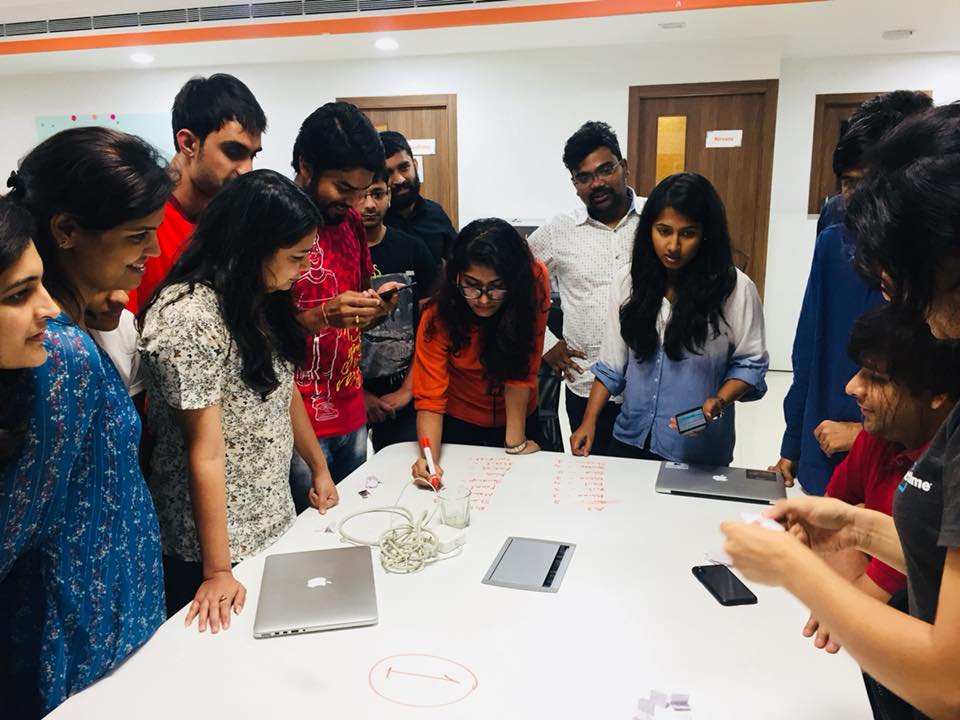
Following is HashedIn User Experience Team’s take on this important but often “less-attended-to” topic. At HashedIn UX, the designers perform role plays, storyboards and interactive sessions even for the dumbest problem on earth as we understand the value these techniques bring to the table and their impact on business when people neglect their communication gaps.
To understand how this gap starts and gets neck-deep during product development, HashedIn UX designers role-played a game activity. The game is played with two players, one narrates a picture without seeing it being drawn and the other player draws the picture being narrated; both facing opposite sides.
See for yourself how communication gaps creeps in….
In the next article, I am going to share with you the techniques HashedIn UX devised to manage this gap effectively. Stay tuned!
Judelyn Gomes
#Business | 4 Min Read
Share:
User experience (UX) plays a paramount role in achieving organizational goals. The success or failure of a project depends on the level of user experience. Every organization is striving to improve the overall experience of the product and delivering quality service to meet customer satisfaction. On the other hand, they make use of various strategies to enhance the user experience. Generally, there are 7 factors that influence the user experience of a project and they are
Useful
Usable
Credible
Findable
Desirable
Accessible
Valuable
Factor #1. Useful
An organization launches the product with the intention of meeting customer needs. People are more obsessed to purchase a brand or company product that yields better results, quickly and effectively. When you make the products that are not useful for the customer, they might get a bad impression on it. So, make sure that you are delivering the products that are useful for customers in a vast manner.
Factor #2. Usable
The products or services that are offered by your company should be ready-to-use. In addition, it is mandatory for you to support the users to achieve their goal effectively and efficiently. So, it is a must to consider the usability feature as critical and develop the products. The first generation of products or services may contain less usability that must be rectified in the second generation and it should be continued to an advanced level.
Factor #3. Findable
An organization must promote their product or service to publish them amid society. Only then people would come to know about your business and reach you to fulfill their needs. Hence, findability feature is very essential for all businesses. It is better to publish your brand in the newspapers, websites, social media platforms and many more platforms that are exclusively available for promotion.
Factor #4. Credible
The trust of the customers on your product or service is termed as the credible factor of user experience. The trust that you build for your brand among people matters more in your success.
As customers are spending their time as well as money on your company you should never fail to deliver your quality service. Also, implement various business strategies such as adding testimonials, portfolios or partner reference to improve the credibility of your business.
Factor #5. Desirable
The desirable factor is nothing but the reaching level of your product or service in the target market. The most-welcomed products have a more desirable feature for their brand, design, usage, and cost.
The improvement of desirable factor will help you to get more customers with the satisfied one thereby enhancing your business. So, put much effort to improve the value of your brand for achieving better user experience. The desirable factor is measured when you have a comeback of satisfied customers which play a vital role in enhancing your business. It is, therefore, essential to increase your brand value which could result in better user experience.
Factor #6. Accessible
Accessibility is one amongst the essential factor of user experience which denotes that introduction of a product or service and making the same access to all kind of people. For instance, physically challenged people should benefit from your business.
The products made shouldn’t be created for a certain community as it can result in deteriorating the value of your brand. It is important to create a good strategic plan while deciding to start a business which would help develop accessible products to society.
Factor #7. Valuable
Whenever you deliver a product or service, ensure that it brings the best results which add value to your brand. The product should not affect the values of both the company and customers in the long run. The lack of value on either side may spoil your business reputation.
Design your business in such a way that it boosts up your reputation rather than lowering it. In addition to this, you can improve the user experience or value factor by providing chances for customers to say their feedback on your website through reviews.
Final Thoughts
To conclude, these seven factors play a vital role in influencing the user experience in an organization. Go through these factors to understand the core concept and develop your business in accordance with it. Adopt seven factors and enhance the user experience of your brand successfully!
Noorul Ameen
#Business | 6 Min Read
Share:
According to Jesse James Garrett, co-founder of Adaptive Path (Strategy and Design Consulting firm), the following are the 5 elements of User Experience Design
Strategy
Scope
Structure
Skeleton
Surface
While converting the user & business goals into great looking product visuals, a designer goes through a beautiful journey of transforming an abstract requirement into a concrete, working model. While strategizing the product, the designer ascertains its User Needs and Business Objectives. Scoping gets Functional Specifications and Content Requirements in place. The structure defines clearly on how the Interaction Design and Information Architecture are charted with the product. Skeleton is where the designer gets to define Interface Design, Navigation Design, and Information Design. Visual Design attributes like Typography, Layout, Branding start surfacing when the designer is almost complete with this journey.
It is important to note that the above-mentioned elements are interdependent, i.e., the choices a designer makes on one will impact the other. As a result of this dependency, it is also essential to start defining an element when the previous element is already Work In Progress. This will reduce issues like “changing design decisions very often, taking uninformed design decisions, etc”
Please remember the fact that Technology has to be appropriate. The right platform is critical in delivering great experiences. Technology extends User Experience Design across multiple OS, browsers, devices and form factors. So technology needs to be inherent in how we design.
STRATEGY
During this phase, the experience designer ascertains the business and user goals by conducting Stakeholder Interviews, Competitor Reviews, User Research, and Existing Product Audit.
The following are some of the key questions he tries to get answers during this phase
What should the product accomplish for the business?
How does this product fit with the company’s business strategy?
How should this product be differentiated from the product line?
Why do customers use a product like this one?
What do customers complain about most often?
When building a B2B product, the designer asks the following questions to the stakeholders
Tell me about your background and role.
What makes a good workday for you?
What are the different groups and roles involved in the process? How do they work together?
What are the biggest problems and inefficiencies?
Tell me about other systems that work with this process.
When building a B2C product, the designer asks the following questions to the target audience
What makes a good experience to you (in the context of product usage)?
What things would you usually do first here? Why?
How often do you use this product?
What do you use it for most often?
What things do you use before, during and after this product?
SCOPE
“Scope and Trade-offs are essential to strategy. They create the need for choice and they purposefully limit what a company offers”
– Michael Porter, Harvard Business Review
Defining the scope forces all players to address potential conflicts – before time is invested in designing and building. Documenting scope provides a reference point for work to be done and a common way to describe that work. Documentation doesn’t have to be epic, but just a common understanding of features, schedules, and milestones. While trade-off is necessary to scope the work, in order to deliver continuous value (the long WOW), the designer needs to figure out how to systemically impress the customers over the life of their relationship with the product.
Follow these simple steps to make this happen
Pack in features upfront
Unfold new experiences over time
Continuously evolve and integrate
STRUCTURE
Interaction Design (IxD) and Information Architecture (IA) are the key components which define the structure of the product being designed.
IxD strives to create meaningful relationships between people and the products by the following
It effectively communicates interactivity and functionality
It reveals simple and complex workflows
It informs users about state changes
When done right, it prevents errors
IxD revolves around the following principles
Consistency helps people use what they know
Visibility of opportunities can invite interaction
Learning is easier when predictions are accurate
Feedback facilitates learning
IA helps organize, categorize and prioritize content. A good IA will help
Navigate efficiently and effectively
Discover new content on repeat usage
Persuade user to perform the intended action
The following are the different types of Information Architectures
Hierarchical Tree – Standard structure with an index page and a series of sub-pages
Hub & Spoke – Central Index (Hub) and user navigate out from here
Nested List – Linear path for the user to navigate to more detailed content
Bento Box (Dashboard) – Displays portions of related content on the main screen
Filtered View – Allows a user to create an alternate view from a specific information set
SKELETON
To most people, UI is the system. A well-designed UI allows people to start using it immediately with little or no help. Building the UI equals performing Interface Design, Navigation Design, and Information Design.
With the help of the following, success in UI design comes from the balance between visual form and technical function
You have to give people the things they need or want
You have to give it to them when and where they want it
You have to deliver it in a visual format that ensures they can (and want to) access all of it
The 10 core principles for great UI design are
Predictability
Consistency
Progressive Disclosure
Intuitiveness or Single-trial learning
Context & Relevance
Navigability
Information Hierarchy, Scent & Depth
Conventions & Metaphors
Occam’s razor – The simplest solution usually tends to be the correct one
Hick’s Law – Every additional choice increases the time required to make a decision
SURFACE
The visual language indicates context and conveys information through the following
Layouts
Typography
Color
Imagery
Sequencing
Visual Identity/Brand
The following are the basic principles of effective visual design
Organize – Provide the user with a clear and consistent conceptual structure
Economise – Do the most with least amount of visual cues
Communicate – Match the presentation to the expectations and capabilities of the user
I am going to detail out the above in the coming posts. So stay tuned.
Special thanks to Joe Natoli, Founder of GiveGoodUX.com, for inspiring me with his 26 years industry experience in User Experience Designing & Consulting.
Miriam Subiksha
#Business | 5 Min Read
Share:
Cloud Computing is the go-to solution for most businesses today. It makes work processes efficient, scalable and economical. It is net-centric, has a flexible architecture and is easily accessible.
However, cloud computing can still make businesses vulnerable. In a survey by Cloud Security Alliance, 73 percent said that data security was the primary concern inhibiting cloud adoption.
As companies begin to move data to the cloud, they have to implement policies and procedures that will enable their employees to take advantage of cloud computing without affecting the security of corporate data.
It is important to identify the top security issues and find remedial measures. In our earlier blog, we explored why businesses need Cloud-Native Architecture. In this blog, we explore the top security concerns for cloud computing.
Data Breach
Data Breaches result from an attack or employee negligence and error. This is a primary cause for concern in cloud platforms. Vulnerabilities in the application or ineffective security practices can also cause data breaches. Employees may log into cloud systems from their phones or personal laptops thus exposing the system to targeted attacks.
CSA defines data breach as involving any kind of information that was not intended for public release, including personal health information, financial information, personally identifiable information, trade secrets, and intellectual property.
A study by the Ponemon Institute says that the chances of a data breach occurring were three times higher for businesses using the cloud. Data Breach isn’t new, but cloud computing has a particular set of attributes that make it more vulnerable.
Account Hijacking
With the increase in adoption of cloud services, organizations have reported an increased occurrence of account hijacking. Such attacks involve using employee’s login information to access sensitive information. Attackers can also modify, insert false information and manipulate the data present in the cloud. They also use scripting bugs or reused passwords to steal credentials without being detected.
Account hijacking could have a detrimental effect at the enterprise level, undermining the firm’s integrity and reputation. This could also have legal implications in industries such as healthcare where patients’ personal medical records are compromised. A robust IAM (Identity Access Management) system can prevent unauthorized access and damage to the organization’s data assets.
Insecure APIs and Interfaces
Customers can tailor their cloud computing experience according to their needs by using Application Programming Interface or APIs.
These are used to extract, manage and interact with information on the cloud. However, the unique characteristics of API leave the door wide open for threats. Hence the security of APIs affects the security and availability of cloud services and platforms.
APIs facilitate communication between applications, herein lies the vulnerability. Firms need to focus on designing APIs with adequate authentication, other access control methods, and encryption technology.
The most recent example of an insecure API was at Salesforce, where an API bug in its Marketing Cloud service exposed customer data. This caused data to be written from one customer account to another.
Insider Threat
An Insider threat is the misuse of information through hostile intent, malware, and even accidents. Insider threats originate from employees or system administrators, who can access confidential information They can also access even more critical systems and eventually data.
When the relationship between the employer and system administrator turn sour, they may resort to leaking privileged information.
There can be several instances of insider threat such as a Salesperson who jumps ship or a rogue admin. In scenarios where the cloud service provider is responsible for security, the risk from insider threat is often greater.
Insider threats can be circumvented through business partnerships, controlled access and prioritizing initiatives.
Malware Injections and APT (Advanced Persistent Threats)
Malware injections are scripts or code that is inserted into the cloud services and begin to mimic valid instances. When embedded into the cloud, they begin to change the normal execution of the code.
Once the malware injection and cloud systems begin to operate in sync attackers can affect the integrity and security of the data. SQL injection attack and cross-site scripting attack are seen very often.
The advanced persistent threat is another form of attack where they infiltrate the IT infrastructure. APTs are able to avoid detection for extended periods of time. APTs sync with normal network traffic by moving laterally through data center networks.
Tips for improving Security on the Cloud
Here are a few simple steps that you can take to utilize the power of the cloud without succumbing to the risks.
Authentication protocols: Implement two factor or multi-factor authentication for access to all cloud applications.
User Access Management: Ensure proper levels of authorization. Each employee should only be able to access data that is required to perform his job.
Monitor user activity: Irregularities in user activity can be detected if there is real-time monitoring. This can help you detect a breach early and implement remedial measures.
Ensure your offboarding process is thorough: Use a systematized deprovisioning system to stop access to the firm’s systems, data and customer information.
Data backup and recovery: A thorough plan can enable data retrieval with as little fuss as possible.
Drive Momentum with Cloud Computing without the Security Risks
Cloud is revolutionizing the way businesses work. It has opened new possibilities in access, storage and flexibility. ‘
It has also left systems wide open for a plethora of security threats. Analyzing the security risks that exist is the first step in building a comprehensive cloud computing strategy that can fuel business growth.
Are you ready to jump into the cloud? Read our blog on launching an enterprise-ready product on the cloud in a day.
Miriam Subiksha
#Business | 6 Min Read
Share:
The influx of technologies like Artificial Intelligence, Big Data, IoT and ML has rendered traditional businesses redundant. Rapidly changing customer needs force firms to evolve and adapt. Digital transformation is the new paradigm, that helps them stay ahead of the competition. Firms leverage the support of the cloud to set up robust digital transformation frameworks.
Cloud fuels innovation by giving a compatible set of APIs for developers. Firms can reuse enterprise data. Cloud offers analytics, functional programming, and low code platforms. It is essential for informed decision making. This ensures the faster launch of enterprise-ready products.
The rise of Cloud Computing and Digital Transformation
According to a survey by Logic Monitor, public cloud engagement and adoption is being driven by enterprises pursuing digital transformation. By 2020, a whopping 83% of workloads will be hosted on the cloud. (Source –Forbes) 74% of Tech CFOs believe that cloud computing will have the greatest impact on their business. (Source – Forbes)
89% of enterprises plan to adopt or have already adopted a digital transformation business strategy with Services (95%), Financial Services (93%) and Healthcare (92%) at the top.
In another study, executives considered digital transformation important for survival in the competitive space. (Source –Forbes) Companies are pushing for digital transformation because it enables an enhanced customer experience, faster time to market and greater innovation.
A study by IDG reveals that 92% of executives consider digital business plans as part of their firm’s strategy. 63% of executives are very close to realizing their digital transformation goals.
Why Businesses Adopt Cloud to Fuel Digital Transformation
Businesses that implement cloud computing and digital transformation report enormous growth and improved efficiency. It enables them to stay relevant and thrive in a dynamic ecosystem. Digital transformation involves finding newer business models. Firms must continuously innovate to stay in the game, and cloud is the catalyst that fuels innovation. As businesses begin to adapt their processes to a digital space, they require cost and work efficiency, elasticity agility and scalability. The cloud provides all of these features.
Here is how the cloud enables digital transformation
1.Agility
A firm has to constantly reinvent its business models. Cloud provides the required infrastructure, platforms and computing abilities that helps firms stay agile and ready for a change.
2. Cost and Labor Effectiveness
Firms don’t have to go to the trouble of investing in and managing the required infrastructure. Cloud computing allows firms to scale up or down, so firms only pay for resources that they use.
3.Security
Moving a database to the cloud offers several advantages of increased protection from threats such as data breaches, disasters, and system shutdown. You can create multiple backups. There is reduced risk of system failure, especially where large amounts of data is involved.
4. Faster Prototyping
Companies follow the cycle of innovating, testing, implementing and repeating. Cloud helps in efficient execution of this process without the need for complicated resources and infrastructure. Hence a company can test and deploy different applications on different platforms during experimentation.
Digital transformation involves replacing legacy systems and traditional work practices with processes that support agility. Files can be made available at any place and at any time. Authority and authentication can be determined for each user, this ensures efficient delegation. There is greater productivity due to collaborative work practices.
The Hybrid Cloud
In spite of its impressive benefits, businesses are moving away from an only public cloud model. A mix of both public and private cloud enables organizations to bring about regulatory compliance, ensure data supremacy, cost optimization, and security. A study by RightScale shows that 85% of firms are using a hybrid cloud strategy.
Hybrid cloud makes faster delivery of apps and services a reality. Firms can combine on-premise systems with an external cloud services provider in a way that provides maximum efficiency. Microsoft has recently introduced the Microsoft Azure Stack, where firms can manage both private and public cloud on a single azure platform
Google also focused solely on the public cloud. Later the hybrid cloud was adopted, with the former VMware CEO Diane Greene steering Google’s cloud strategy. Google’s partnership with Nutanix serves to strengthen the hybrid cloud model. Customers can run applications both on-premise and in the public cloud.
Digital Transformation in Action
Schneider Electric, a leader in the energy management and automation space, uses EcoStruxure Platform as the IoT backbone. It offers:
embedded connectivity and intelligence.
a foundation for smart operations that is interoperable.
A reliable infrastructure for digital services connected to the cloud.
This platform enables faster at scale delivery of IoT-enabled solutions for smart buildings and data centers. It uses Microsoft’s Azure as the cloud framework to offer its digital services and analytics. EcoStruxure closes the gap between IT and OT.
Users are able to utilize the platform to connect equipment and software to the cloud, using IoT technology. Schneider Electric’s EcoStruxure simplifies the process of connecting IoT devices, collection, and analysis of data, and using real-time information to improve operations.
Challenges in Implementing Cloud for Digital Transformation
Data Security and Service Quality
Information, when migrated to the cloud, requires additional security measures. The cloud service provider holds the user’s security and privacy controls, exposing critical information to attack. Poor quality of cloud services also poses a challenge. A possible solution is to retain control of data and enable real-time analysis via dashboards. Performance, scalability, and availability of cloud services are also important factors to consider.
Performance and Costs
Data-intensive applications often result in higher costs. Bandwidth requirements increase when exhaustive and intricate data is sent over the network. Organizations should move to a metered and dynamic pricing model to keep costs down. Cloud service providers must also provide the option to fix costs for each service.
Migrating and integrating Existing Systems
Migrating legacy systems is a cumbersome task. However, with a sufficient budget and organization-wide support, this can be accomplished. The challenge is to integrate the existing infrastructure with the cloud to ensure maximum efficiency and productivity.
Governance
Governance ensures that information and data are used in accordance with agreed upon policies and procedures. IT governance must also align with overarching business goals and objectives. Cloud-based systems offer only partial control over how infrastructure is provided and operated. Hence the need for stringent governance measures.
Cloud is Essential for Advancing Digital Transformation
As the world evolves and tech moves at breakneck speed, digital transformation becomes a means of survival. Cloud becomes the catalyst for this transformation and the hybrid cloud will have a key role to play. In an era where success is measured by customer experience, a cloud-enabled and cloud-delivered business model helps organization discover newer channels to offer a superior customer experience.
Tharika Tellicherry
#Technology | 1 Min Read
Share:
1) Introduction to Docker
Containers vs Virtual Machines
Terms “Containers” and “Virtual Machines” are often used interchangeably, however, this is often a misunderstanding. But, both are just different methods to provide Operating System Virtualization.
Standard virtual machines generally include a full Operating System, OS Packages and if required, few applications. This is made possible by a Hypervisor which provides hardware virtualization to the virtual machine. This allows for a single server to run many standalone operating systems as virtual guests.
Containers are similar to virtual machines except that Containers are not full operating systems. Containers generally only include the necessary OS Packages and Applications. They do not generally contain a full operating system or hardware virtualization, that’s why these are “lightweight”.
Virtual Machines are a way to take a physical server and provide a fully functional operating environment that shares those physical resources with other virtual machines.
Whereas, a Container is generally used to isolate a running process within a single host to ensure that the isolated processes cannot interact with other processes within that same system. Containers sandbox processes from each other. For now, you can think of a container as a lightweight equivalent of a virtual machine.
Docker enables creating and working with Containers as easy as possible.
Getting started with Docker
We explore the basics to get started with Docker. The parts include:
Part 1: How to Install Docker
Part 2: How to use Docker Images
Part 3: How to create Production Ready Docker Image
Part 4: How to deploy with docker compose
Part 5: Web App To Multi-Host App Using Docker Swarm
3) Part 1: How to Install Docker
To get started with docker basics, install docker using package manager like apt-get, yum, etc. Since our example system is running Ubuntu 16.4.1, we will do this using the apt package manager. To avoid confusion during docker basic training, I will avoid installation steps. After installation, for a start, to check if any containers are running we can execute the docker command using the ps option.
docker ps
CONTAINER ID IMAGE COMMAND CREATED STATUS PORTS NAMES
The ps function of the docker command works similar to the Linux ps command. It will show available Docker containers and their current statuses. Since we have not started any Docker containers yet, the command shows no running containers.
Deploying a pre-built nginx Docker
One of my favorite features of Docker is the ability to deploy a pre-built container in the same way you would deploy a package with yum or apt-get. To explain this better let’s deploy a pre-built container running the Nginx web server. We can do this by executing the docker command again. However, this time with the run option. The run function of the docker command tells Docker to find a specified Docker image and start a container running that image. By default, Docker containers run in the foreground.
In order to launch this Docker container in the background, I included the –d (detach) flag.
Step 1 – Trying to run a docker
The run function of the docker command tells Docker to find a specified Docker image and start a container running that image. By default, Docker containers run in the foreground. That means, when you execute docker run, your shell will be bound to the container’s console and the process running within the container. In order to launch this Docker container in the background, I included the -d (detach) flag.
Step 2 – See if it’s actually running
docker ps
CONTAINER ID IMAGE        COMMAND       CREATED      STATUS PORTS           NAMES
f6d31sa07fc9 httpd:latest 4 seconds ago Up 3 seconds        443/tcp, 80/tcp test
Part 2: How To Use Docker Images
Images are one of Docker’s basic and key features and are similar to a virtual machine image. Like virtual machine images, a Docker image is a container that has been saved and packaged. Docker, however, doesn’t just stop with the ability to create images. Docker also includes the ability to distribute those images via Docker repositories which are a similar concept to package repositories. This is what gives Docker the ability to deploy an image like you would deploy a package with yum. To get a better understanding of how this works let us look back at the output of the docker run execution.
Break down of Step 2 – Image not found
docker run -d httpd
Unable to find image 'httpd' locally
The first message we see is that docker could not find an image named httpd locally. The reason we see this message is that when we executed docker run we told Docker to start up a container, a container based on an image named httpd. Since Docker is starting a container based on a specified image, it needs to first find that image. Before checking any remote repository, Docker first checks locally to see if there is a local image with the specified name. Since the system where I “ran” the docker didn’t have an image with name httpd, Docker downloaded it from a Docker repository.
Break down of Step 2 – Downloading the image
This is exactly what the second part of the output is showing us. By default, Docker uses the Docker Hub repository, which is a repository service that Docker community runs. Like GitHub, Docker Hub is free for public repositories but requires a subscription for private repositories. It is possible, however, to deploy your own Docker repository, in fact, it is as easy as docker run registry. For now, we will skip the learning registry on a custom repository.
Stopping and Removing the Container
Let’s clean up our Docker environment to conclude docker basic training. We will do this by stopping the container from earlier and removing it.To start a container we executed docker with the run option, in order to stop this same container we simply need to execute the docker with the kill option specifying the container name.
docker kill test
test
You can confirm this by running docker ps again.
docker ps
CONTAINER ID IMAGE COMMAND CREATED STATUS PORTS NAMES
However, at this point we have only stopped the container; while it may no longer be running, it still exists. By default, docker ps will only show running containers, if we add the -a (all) flag it will show all containers running or not.
docker ps -a
CONTAINER ID IMAGE COMMAND CREATED STATUS NAMES
f6d31sa07fc9 5c82215b03d1 4 weeks ago Exited (-1) About a minute ago test
In order to fully remove the container, we can use the docker command with the rm option.
docker rm test
test
While this container has been removed, we still have an httpd image available. If we were to re-run docker run -d httpd again the container would be started without having to fetch the httpd image again.This is because Docker already has a saved copy on our local system. To see a full list of local images we can simply run the docker command with the images option.
docker images REPOSITORY TAG IMAGE ID CREATED httpd latest 9fab4645484a 1 days ago
Part 3: Production Ready Docker Image
Docker is a great tool to containerized an application(Containers, allow to package an application with its runtime dependencies). In HashedIn, we have been using docker for both internal & external projects and have learned good lessons from them. In this article, we will discuss strategy to create production-ready docker image taking intoCharchaaccount.
Important checklist for creating a docker image
Lightweight Image: Application should be packaged with a minimal set of things which is required to run the application. We should avoid putting unnecessary build/dev dependencies. Never add secrets: Your application might need various secrets like credentials to talk to S3 / database etc. These are all runtime dependencies for the application and they should never be added to docker image. Leverage docker caching: Every statement(except few ones) in Dockerfile, creates a layer(intermediate image) and to make build faster docker tries to cache these layer. We should pay attention to arrange our docker statements in a way to maximize the uses of docker cache. Note: As per documentation
Except for ADD & COPY, usually, instruction in dockerfile will be used to see matches for existing images.
For the ADD and COPY instructions, the contents of the file(s) in the image are examined and a checksum is calculated for each file. During the cache lookup, the checksum is compared against the checksum in the existing images.
Since a code is going to be changed very frequently than its dependencies, it is better to add requirements and install them before adding codebase in an image.
Dockerfile for Charcha
Let’s see dockerfile for charcha, which tries to adhere to the above-discussed checklist. Each instruction in dockerfile has been documented with inline comments which should describe the importance of the instruction.
# charcha is based on python3.6, let's choose the minimal base image for python. We will use Alipne Linux based image as they are much slimer than other linux images. python:3.6-alpine - is an official(developed /approved by docker team) python image.
FROM python:3.6-alpine
# Creating working directory as charcha. Here we will add charcha codebase.
WORKDIR /charcha
# Add your requirements first, so that we can install requirements first
# Why? Requirements are not going to change very often in comparison to code
# so, better to cache this statement and all dependencies in this layer.
ADD requirements.txt /charcha
ADD requirements /charcha/requirements
# Install system dependencies, which are required by python packages
# We are using WebPusher for push notification which uses pyelliptic OpenSSL which
# uses `ctypes.util.find_library`. `ctypes.util.find_library` seems to be broken with current version of alpine.
# `ctypes.util.find_library` make use of gcc to search for library, and hence we need this during
# runtime.
# https://github.com/docker-library/python/issues/111
RUN apk add --no-cache gcc
# Package all libraries installed as build-deps, as few of them might only be required during
# installation and during execution.
RUN apk add --no-cache --virtual build-deps \
      make \
      libc-dev \
      musl-dev \
      linux-headers \
      pcre-dev \
      postgresql-dev \
      libffi \
      libffi-dev \
      # Don't cache pip packages
      && pip install --no-cache-dir -r /charcha/requirements/production.txt \
      # Find all the library dependencies which are required by python packages.
      # This technique is being used in creation of python:alipne & slim images
      # https://github.com/docker-library/python/blob/master/3.6/alpine/Dockerfile
      && runDeps="$( \
      scanelf --needed --nobanner --recursive /usr/local \
              | awk '{ gsub(/,/, "\nso:", $2); print "so:" $2 }' \
              | sort -u \
              | xargs -r apk info --installed \
              | sort -u \
      )" \
      && apk add --virtual app-rundeps $runDeps \
      # Get rid of all unused libraries
      && apk del build-deps \
      # find_library is broken in alpine, looks like it doesn't take version of lib in consideration
      # and apk del seems to remove sim-link /usr/lib/libcrypto.so
      # Create sim-link again
      # TODO: Find a better way to do this more generically.
      && ln -s /usr/lib/$(ls /usr/lib/ | grep libcrypto | head -n1) /usr/lib/libcrypto.so
# Add charcha codebase in workdir
ADD . /charcha
Question: What will happen if we move our Add . /charcha statement up, just after WORKDIR /charcha. That way we didn’t need add requirements separately?
Answer: As discussed above, your code is going to be changed very frequently in comparison to requirements file. And since for ADD statement, docker tries to create checksum using content of files to match against its cache keys, there will be very high chance of cache miss(because of content change). Also, once the cache is invalidated, all subsequent Dockerfile commands will generate new images and the cache will not be used. And hence, even though we didn’t have updated our requirements, almost every build will end up in installing dependencies.
This dockerfile provides production-ready image, with a minimal set of dependencies. To play with this image locally you can try following steps:
1) Build docker image:
Create a docker image using above specified dockerfile.
$ docker build --rm -t charcha:1.0 .
Above command will create a docker image using the current directory as context and then tag the image as Charcha:1.0. Command also specifies to remove any intermediate images. For more information on docker build refer to this link.
Note: docker build will be executed by docker daemon, and hence the first thing a build process does is, it sends the complete docker context(in our case,the entire content of the current directory) to the daemon. Your context path might contain some unnecessary files like .git folder, ide related files etc. which are not at all required to build the image. So, it is a best practice to add a .dockerignore file which is more like .gitignore and lists files & folders which needs to be ignored by the daemon.
Following is the dockerignore file for charcha.
.git
Dockerfile
docker-compose.yml
Procfile
2) Create a container from docker image:
   # This command will run shell in interactive mode for charcha container and will land you in
   # /charcha directory, because we have defined /charcha as our workdir in dockerfile.
   $ docker run -p8000:8000 -it charcha:1.0 /bin/sh
   # Running commands inside container
   /charcha $ python manage.py migrate
   /charcha $ python manage.py makemigrations charcha
   /charcha $ python manage.py runserver 0.0.0.0:8000
Now, charcha should be running(using local settings) in docker container and you can access charcha locally at http://localhost:8000. In coming blogs, we will discuss how to use docker-compose to do stuffs automatically, which we have done here manually and how to locally create production like environment.
Part 4: Deployment with docker compose
Docker Compose is a tool for defining and running multi-docker apps. It allows you to create and test applications based on multifaceted software stacks and libraries. Here, we explore ways to use docker-compose to manage deployments.
Need for Docker Compose
An application can consist of multiple tiers or sub-components. In containerized deployment, these components need to be deployed as an individual unit. For example, if an application consists of database and caching server, then the database and caching server should be considered as individual components and should be deployed as a separate component. A very simple philosophy is, “Each container should run only one process”.
Running multiple containers using docker CLI is possible but really painful. Also, scaling any individual component might be a requirement but this adds more complexity in management of containers. Docker-Compose is a tool which addresses this problem very efficiently. It uses a simple YML file to describe complete application and dependency between them. It also provides the convenient way to monitor and scale individual components, which it termed as services. In the following section, we will see how to use docker compose to manage Charcha’s production ready deployment.
Using docker compose to manage Charcha’s production ready deployment
In the previous section create production-ready docker image, we have created a production ready docker images ofcharcha.We are going to use the same image in this discussion. Let’s start with simple compose file. For the production system we need the following things: Database: As per our settings file, we need postgres. App Server: A production ready app server to serve our Django app. We are going to use gunicornfor this. Reverse Proxy WebServer: Our app server should be running behind a reverse proxy to prevent it from denial of service attack. Running gunicron behind a reverse proxy is recommended. This reverse proxy will also perform few additional things such as;3.1. Serve pre-gzipped static files from the application3.2 SSL offloading/termination. Read this to understand the benefits.
Let’s build each service step by step in docker-compose.yml file created at the root of the project. For brevity, every step will only add configs related to that step.
1) Create service for database
“`YAML version: ‘2’ services: db: # Service name # This is important, always restart this service if it gets stopped restart: always # Use postgres official image image: postgres: latest # Expose postgres port to be used by Web service expose:
5432 environment: # Some environment variables accepted by postgres image
POSTGRES_PASSWORD=password
POSTGRES_USER=user
POSTGRES_DB=charcha “` This is a simple docker-compose file to create a database as the service.
2) Create service for an app
To create our app service we are going to use previously discussed (Dockerfile)[/2017/05/02/create-production-ready-docker-image] for charcha. This service will run, db migration(and hence need to linked with database service) and run a gunicorn application at 8000.
Here is the app config which needs to be added in a previously created docker-compose file.
app:
    build: .
    # For this service run init.sh
    command: sh ./init.sh
    restart: always
    # expose port for other containers
    expose:
      - "8000"
    # Link database container
    links:
      - db:db
    # export environment variables for this container
    # NOTE: In production, value of these should be replaced with
    # ${variable} which will be provided at runtime.
    environment:
      - DJANGO_SETTINGS_MODULE=charcha.settings.production
      - DATABASE_URL=postgres://user:password@db:5432/charcha
      - DJANGO_SECRET_KEY=ljwwdojoqdjoqojwjqdoqwodq
      - LOGENTRIES_KEY=${LOGENTRIES_KEY}
    command: python manage.py migrate --no-input && gunicorn charcha.wsgi -b 0.0.0.0:8000
Create reverse proxy service:
To create reverse proxy service we are going to use official nginx image and will mount charcha/staticfiles folder into the nginx container. Before proceeding to create a docker-compose config for this service we need following things.
3.1 A SSL certificate:
Charcha production settings has been configured to only accept HTTPS requests. Now, instead of adding SSL certificate at App server, we will add certificate at nginx to offload SSL here. This will add performance gain. Follow these steps to create SSL certificate.
# On linking service, docker will automatically add
  # resolver for service name
  # Use upstream to resolve the service name.
   upstream backend {
       server web:8000;
   }
   server {
     # listen for HTTPS request
     listen 443 ssl;
     access_log  /var/log/nginx/access.log;
     server_name charcha.hashedin.com;
     ssl_certificate /etc/ssl/nginx.crt;
     ssl_certificate_key /etc/ssl/nginx.key;
     ssl_protocols TLSv1 TLSv1.1 TLSv1.2;
     ssl_prefer_server_ciphers on;
     ssl_ciphers "EECDH+AESGCM:EDH+AESGCM:AES256+EECDH:AES256+EDH";
     ssl_ecdh_curve secp384r1;
     ssl_session_cache shared:SSL:10m;
     ssl_session_tickets off;
     add_header Strict-Transport-Security "max-age=63072000; includeSubdomains";
     add_header X-Frame-Options DENY;
     add_header X-Content-Type-Options nosniff;
     ssl_dhparam /etc/ssl/dhparam.pem;
     # Serve all pre-gziped static files from its mounted volume
     location /static/ {
         gzip_static on;
         expires     max;
         add_header  Cache-Control public;
         autoindex on;
         alias /static/;
     }
     location / {
         # Set these headers to let application to know that
         # request was made over HTTPS. Gunicorn by default read
         # X-Forwarded-Proto header to read the scheme
         proxy_set_header Host $host;
         proxy_set_header X-Real-IP $remote_addr;
         proxy_set_header X-Forwarded-Proto $scheme;
         proxy_redirect off;
         # Forward the request to upstream(App service)
         proxy_pass http://backend;
     }
   }
   server {
    # Listen for HTTP request and redirect it to HTTPS
    listen 80;
    server_name charcha.hashedin.com;
    return 301 https://$host$request_uri;
   }
Now, let’s define nginx service in docker-compose.
nginx:
    image: nginx:latest
    restart: always
    ports:
      - 80:80
      - 443:443
    links:
      - web:web
    volumes:
      # deployment is the folder where we have added few configurations in previous step
      - ./deployment/nginx:/etc/nginx/conf.d
      - ./deployment/ssl:/etc/ssl
      # attach staticfiles(folder created by collectstatic) to /static
      - ./charcha/staticfiles:/static
Finally, we have completed our docker-compose and all required configuration and ready to start production like environment on a dev box. You can run the following steps to start playing with it.
Run services: docker-compose up -d
Verify all services are in running state docker-compose ps, you should out like;
Name              Command              State          Ports
-------------------------------------------------------------------------------
charcha_db_1      docker-entrypoint.sh postgres   Up      5432/tcp
charcha_nginx_1   nginx -g daemon off;            Up      0.0.0.0:443->443/tcp, 0.0.0.0:80->80/tcp
charcha_web_1     sh ./init.sh                    Up      8000/tcp
Now, you can start accessing the application at https://charcha.hashedin.com.
IMP: charcha.hashedin.com as hostname is checked from an application, so you can’t access it from localhost. Also, at this point, you didn’t have any DNS entry for this. To workaround, a simple trick is to use your /etc/hostsfile to do the local name resolution. sudo echo "127.0.0.1 charcha.hashedin.com >> /etc/hosts"
Additional stuff to help in debugging
To view the logs for all services use docker-compose logs
In case you want to see the logs for a particular service use docker-compose logs eg. docker-compose logs web
For Login into running container ` docker exec -it `
Here is the final docker-compose file
version: '2'
# define multiple services
services:
  # Web service which runs gunicron application
  web:
    # Create build using Dockerfile present in current folder
    build: .
    # For this service run init.sh
    command: sh ./init.sh
    restart: always
    # expose port for other containers
    expose:
      - "8000"
    # Link database container
    links:
      - db:db
    # export environment variables for this container
    # NOTE: In production, value of these should be replaced with
    # ${variable} which will be provided at runtime.
    environment:
      - DJANGO_SETTINGS_MODULE=charcha.settings.production
      - DATABASE_URL=postgres://user:password@db:5432/charcha
      - DJANGO_SECRET_KEY=ljwwdojoqdjoqojwjqdoqwodq
      - LOGENTRIES_KEY=${LOGENTRIES_KEY}
  nginx:
    image: nginx:latest
    restart: always
    ports:
      - 80:80
      - 443:443
    links:
      - web:web
    volumes:
      # deployment is the folder where we have added few configurations
      - ./deployment/nginx:/etc/nginx/conf.d
      - ./deployment/ssl:/etc/ssl
      - ./charcha/staticfiles:/static
  db:
    restart: always
    image: postgres:latest
    expose:
      - 5432
    environment:
      - POSTGRES_PASSWORD=password
      - POSTGRES_USER=user
      - POSTGRES_DB=charcha
Summary
In deployment with docker compose series, till now we read how to create production-ready docker image and use it with docker-compose. You can try this in production with little changes(like reading environment variables instead of hard-coding in compose file) on a single large VM. In coming blogs we will further discuss gaps with docker-compose and be using ECS / Swarm /Kubernets like container management services, in a production environment to fill those gaps.
Part 5: Web App To Multi-Host App Using Docker Swarm
ften we run into architecting an application which has unpredictable load thus making it nearly impossible to predict the resource & infrastructure requirements during designing of a system. Additional design factors come into the picture if the application caters to the ever-changing hospitality industry, where we have to take care of dynamic content changes.
Various solution to these problems would have been discussed, but we tried to solve this problem by running multiple Docker containers on the same machine, thus utilizing the full power of hardware resources. Let’s dwell on the use case in detail for a better understanding of its design. The hospitality business web app under consideration had a legacy technology framework. They had on-prem, single server, on LAMP stack.
Over time, the systems were prone to security attacks & performance bottlenecks. There were many single points of failures in the system like Redis servers, Nginx and HAProxy; which was dangerous, given that we only had one on-prem server. Business wanted to scale and thus technology had to be upgraded. The need of the hour was to work in an agile mode and get things done on a short notice with high quality, reliability, and accuracy.
To cater to these technological challenges we needed to overhaul their existing framework, without impacting their business operations. With old systems, there was substantial maintenance cost associated and therefore, the business objective was cost reduction and reliability to support business scalability.
Few options that we considered
Going along with AWS which provides most of the services out of the box
Another option was to go with stand-alone servers and use Dockers
Caching on HAProxy level or nginx level
Using Redis Master-Slave or Sentinel architecture
The Final Verdict!
We decided to go with multiple Docker containers hosted on the same server. Reason being –
Moving to AWS was shot down given the humongous existing on-prem setup
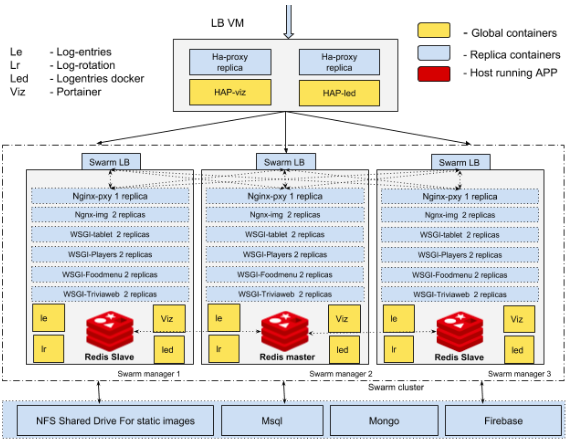
We scaled up the number of servers and used Dockers Swarm, which would provide an automated management tool to manage all the containers
Docker Swarm provides better fault tolerance & high availability to the application since a server crash will not impact the application. There is one catch with Docker Swarm, fault tolerance comes with odd numbers of servers only. That means, in the case of 3 servers, the application will work perfectly if one server goes off i.e, 1:3 ratio. We hope that Docker Swarm team adds support for the even number of servers also.
Horizontal Scalability – Swarm add hosts to handle increased load without making changes to the application
No Downtime during server maintenance/upgrades.
The overall server was brought down by using Dockers
Solution Details:
In addition to using Dockers Swarm, multiple other components were re-thought.
We moved away from traditional Redis setup to Redis Sentinel setup, thus avoiding another single point of failures in the system.
We implemented 2 level of load balancing; one at HAProxy level by using replicas. The second one at Swarm Load Balancers. The load is distributed between servers.
We also replicated micro apps within each container to ensure that resource utilization was most efficient at all times.
We implemented centralized nginx with Etag for caching data. APIs data cached on nginx layer reduces the response time and increase performance. Etag is used to make sure duplication is avoided with the same data from API as Etag will change only when data is different from the one being cached in nginx.
Results: The current application runs on more than 50,000 devices placed across the United States with more than 2 million requests with zero downtime and 4x performance improvement.
Fig 1: High-level Multi-Host Architecture for our client
Fig2: The detailed layered internal architecture
Tech Stack Choices:
Tech stack is our point of focus to assist architecture focus points. Our team engage and evaluate/design using React for UI implementation and rely on python for backend integration. Software portability and maintenance defines the tools utilized and for easier deployment. Currently, Redis is used for in-memory caching of data and sessions.
Redis is an in-memory database structure, which persists our data and hence reduces our external DB calls for fetching data. In design cases, where two-way communication is a priority along with compatibility and security,
Firebase is our choice. Firebase, which is a mobile or web application development platform provides data storage and real-time synchronization. Firebase supports both react and python and provides malleable rule sets with security features.
Software Deployment and Testing
Given the need of being first time right in the business use case, we follow test-driven approach. In this approach, the team starts with test cases and then proceed towards actual implementation. In order to reduce the tester dependency, the team has implemented an automated unit and integration test cases. These test cases reduce the tester’s effort by around 40%; thus improving the delivery speed and quality.
“Writing test cases is Worth the time”
In case of deployment, continuous deployment setup is engaged where jenkins will trigger a build automatically at a particular/specified time. With production, development comes the performance part of it. In order to make sure product performance is stable, our team has used multiple tools – Jmeter, AB and gatling. In all these tools, define the API to test, the number of users and gradually increase the users to recreate the actual scenario. Such robustness testing has yielded praises from our clients.
Having deployed solutions at client base and they are testimonials to our design efforts. Our applications run on more than 50,000 devices placed across the United States with more than 2 million requests with zero downtime and 4x performance improvement.
Conclusion:
To go ahead with multi-host implementation, we need to keep track of the following things:
Choose framework depending on the use case
Fault Tolerance comes with odd numbers servers only (Eg. FT will be 1 with the 3 servers, 2 with the 5 servers and so on) in Docker Swarm.
Thanmayi Devaladakere
#Company | 5 Min Read
Share:
HashedIn has been recently recognized as one of India’s best IT companies to work for in 2018 by Great Place To Work Institute. We are one of top 10 IT service companies headquartered in India to be certified as a “Great Place To Work“. The icing on the cake is that HashedIn is the only company from Bangalore to make it to the list. It’s a proud moment for us, Hashers and I feel blessed to be part of this unique, winning culture at HashedIn.
When I started writing this blog, I felt I should write about my experience at HashedIn as an employee rather writing it as an HR personnel. Nearly a year back, when I first attended the interview at HashedIn, I was pleasantly surprised by the happy vibes I got from the office. I was not disappointed on my first day at work. It was great!
It’s been more than a year now and it still feels great like I did on my first day of the job. In this blog, I want to share my experience as a Hasher and the reasons why I love working with HashedIn. Here are the top 5 reasons that make HashedIn a great place to work:
1) No Monday blues
Walking into a happy workplace on a Monday morning is one of the best things to happen to me in my career. We have a very open, flexible, and collaborative work culture at HashedIn. The on-boarding process includes a scavenger hunt, games, and interactive sessions. These activities encourage new joiners to explore the office and interact with colleagues. You feel at home instantly. New joiners are also assigned a HashedIn buddy who helps them get familiarized with the office, the HashedIn policies, their team, and their role. Right from day one, you feel like you are part of the team and the HashedIn family. When work is fun and enjoyable, it is easy to fall in love with Mondays.
We love Mondays.
2) Flexibility
Flexibility means different things to different people. I am a working mom and flexibility at work is important to me. HashedIn gives me the flexibility to work from home, manage my work time in a way that helps me to take care of both my family needs and my career goals.
Women constitute over 30% of HashedIn’s total strength and the company has some amazing women-friendly policies. Employees have even brought their kids to the office. HashedIn makes you feel valued and appreciated. With supportive colleagues and flexible work policies, everyone can win at work and have a great work-life balance.
We respect freedom.
3) Ownership
At HashedIn, there is a lot of emphasis on teamwork, fairness, and collaborative decision-making. You can approach anyone from the CEO to your peers to share your ideas and execute projects. In the very first week of joining the team, I had my first ‘Chai with CEO’ session, where I could share my open feedback and ideas directly with the CEO.
Even the office space has no cabin system. You can sit anywhere and interact with any team.There is no micromanagement or red tape. Whether you are an intern or a manager, you have the freedom to share valuable ideas and bring them to life.
We are innovators.
4) The HashedIn perks
Working at HashedIn has a lot of perks. I love the facilities I get at the office like free home cooked food, gym, access to a fully stocked pantry, etc. We also have a fully loaded games room. Whether it is an All Hands Meet or An Open House, there is always something fun lined up. You get recognized for your contributions with Spot awards and rewards. Entire team goes for outings to exotic locations like Goa. The perks at HashedIn are pretty awesome.
We have a lot of perks!
5) Happy and fun loving team
I work with some of the smartest and coolest people in the country. I never had a dull day at work. We have many fun activities and games throughout the week to keep everyone energized and refreshed. From Zumba sessions to CSR initiatives, you can participate in a lot of activities outside your scope of work. We also celebrate all major festivals from Eid to Holi. Thanks to the happy and fun loving team at HashedIn, I look forward to going to work every day.
We are HashedIn.
It feels great to be officially recognized as one of the coolest IT companies to work for! I want to thank all the Hashers and well-wishers who made this possible. This is just the start! We will continue to be the brand ambassadors of HashedIn and strive to become better every day.
Want to join the HashedIn family? Check out current openings here